Friday, October 30, 2020

The move to dynamic distributed cloud architectures

Edge computing is getting a great deal of attention now, and for good reason. Cloud architecture requires that some processing be placed closest to the point of data consumption. Think computing systems in your car, industrial robots, and now full-blown connected mini clouds such as Microsoft’s Stack and AWS’s Outpost, certainly all examples of edge computing.

The architectural approach to edge computing—and IoT (Internet of Things), for that matter—is the creation of edge computing replicants in the public clouds. You can think of these as clones of what exists on the edge computing device or platform, allowing you to sync changes and manage configurations on “the edge” centrally.

To read this article in full, please click here

Thursday, October 29, 2020

New – Application Load Balancer Support for End-to-End HTTP/2 and gRPC

Thanks to its efficiency and support for numerous programming languages, gRPC is a popular choice for microservice integrations and client-server communications. gRPC is a high performance remote procedure call (RPC) framework using HTTP/2 for transport and Protocol Buffers to describe the interface. To make it easier to use gRPC with your applications, Application Load Balancer (ALB) […] Via AWS News Blog https://ift.tt/1EusYcK

Wednesday, October 28, 2020

AWS Nitro Enclaves – Isolated EC2 Environments to Process Confidential Data

When I first told you about the AWS Nitro System, I said: The Nitro system is a rich collection of building blocks that can be assembled in many different ways, giving us the flexibility to design and rapidly deliver EC2 instance types with an ever-broadening selection of compute, storage, memory, and networking options. To date, […] Via AWS News Blog https://ift.tt/1EusYcK

Tuesday, October 27, 2020

Why you’re doing cloudops wrong

Cloud operations, aka cloudops, is the long tail in the cloud computing migration and development story. It takes place after you deploy cloud-based solutions and then operate them over a long period of time. Cloudops determines the success of a migration or development effort and the success of user and customer experiences.

Some things going wrong in cloudops right now need some attention. First is too many types of operational tools, such as management and monitoring. These tools drive more operational complexity, which can result in human errors that, in turn, cause operational issues. Another problem is enterprises that underestimate the resources required to drive cloudops. Because we’re moving to largely heterogeneous, multicloud deployments, we’ve tripled the number of resources under management in the past four years, yet the size of most ops staffs has remained the same. Third is a lack of cross-cloud security solutions. Generally speaking, you can’t scale native security services on each public cloud; risk and vulnerabilities begin to emerge. Security needs to be more than an afterthought.

To read this article in full, please click here

Friday, October 23, 2020

Cloud adoption in a post-COVID world

I drew some big lines in the sand by predicting that the pandemic would cause a run on cloud computing. The pandemic quickly proved that companies leveraging more public cloud resources than their competitors and peers have much less exposure to risk than those that do not. Priorities soon shifted to cloud migration on the fastest path possible. The result is a pandemic run on cloud migration tools, experienced cloud pros, cloud consulting, and public clouds themselves. 

Most of us didn’t believe the experts’ predictions that pandemic quarantines and restrictions could linger until the end of summer, with another spike during flu season in the fall. It’s now October, the start of flu season. Cases are spiking to record levels. Pandemic restrictions are still in place in many states. I don’t need a crystal ball to predict that the current run on cloud will continue until the end of the pandemic. 

To read this article in full, please click here

Thursday, October 22, 2020

Introducing Amazon SNS FIFO – First-In-First-Out Pub/Sub Messaging

When designing a distributed software architecture, it is important to define how services exchange information. For example, the use of asynchronous communication decouples components and simplifies scaling, reducing the impact of changes and making it easier to release new features.

The two most common forms of asynchronous service-to-service communication are message queues and publish/subscribe messaging:

  • With message queues, messages are stored on the queue until they are processed and deleted by a consumer. On AWS, Amazon Simple Queue Service (SQS) provides a fully managed message queuing service with no administrative overhead.
  • With pub/sub messaging, a message published to a topic is delivered to all subscribers to the topic. On AWS, Amazon Simple Notification Service (SNS) is a fully managed pub/sub messaging service that enables message delivery to a large number of subscribers. Each subscriber can also set a filter policy to receive only the messages that it cares about.

You can use topics when you want to fan out messages to multiple applications, and queues when you want to send messages to one application. Using topics and queues together, you can decouple microservices, distributed systems, and serverless applications.

With SQS, you can use FIFO (First-In-First-Out) queues to preserve the order in which messages are sent and received, and to avoid that a message is processed more than once.

Introducing SNS FIFO Topics
Today, we are adding similar capabilities for pub/sub messaging with the introduction of SNS FIFO topics, providing strict message ordering and deduplicated message delivery to one or more subscribers.

FIFO topics manage ordering and deduplication similar to FIFO queues:

Ordering – You configure a message group by including a message group ID when publishing a message to a FIFO topic. For each message group ID, all messages are sent and delivered in order of their arrival. For example, to ensure the delivery of messages related to the same customer in order, you can publish these messages to the topic using the customer’s account number as the message group ID. There is no limit in the number of message groups with FIFO topics and queues. You don’t need to declare in advance the message group ID, any value will work. If you don’t have a logical distinction between messages, you can simply use the same message group ID for all and have a single group of ordered messages. The message group ID is passed to any subscribed FIFO queue.

Deduplication – Distributed systems (like SNS) and client applications sometimes generate duplicate messages. You can avoid duplicated message deliveries from the topic in two ways: either by enabling content-based deduplication on the topic, or by adding a deduplication ID to the messages that you publish. With message content-based deduplication, SNS uses a SHA-256 hash to generate the message deduplication ID using the body of the message. After a message with a specific deduplication ID is published successfully, there is a 5-minute interval during which any message with the same deduplication ID is accepted but not delivered. If you subscribe a FIFO queue to a FIFO topic, the deduplication ID is passed to the queue and it is used by SQS to avoid duplicate messages being received.

You can use FIFO topics and queues together to simplify the implementation of applications where the order of operations and events is critical, or when you cannot tolerate duplicates. For example, to process financial operations and inventory updates, or to asynchronously apply commands that you receive from a client device. FIFO queues can use message filtering in FIFO topics to selectively receive only a subset of messages rather than every message published to the topic.

How to Use SNS FIFO Topics
A common scenario where FIFO topics can help is when you receive updates that need to be processed in order. For example, I can use a FIFO topic to receive updates from an application where my customers edit their account profiles. Then, I subscribe an SQS FIFO queue to the FIFO topic, and use the queue as trigger for a Lambda function that applies the account updates to an Amazon DynamoDB table used by my Customer management system that needs to be kept in sync.

The decoupling introduced by the FIFO topic makes it easier to add new functionality with minimal impact to existing applications. For example, to reward my loyal customers with additional promotions, I add a new Loyalty application that is storing information in a relational database managed by Amazon Aurora. To keep the customer’s information stored in the Loyalty database in sync with my other applications, I can subscribe a new FIFO queue to the same FIFO topic, and add a new Lambda function that receives customer updates in the same order as they are generated, and applies them to the Loyalty database. In this way, I don’t need to change code and configuration of other applications to integrate the new Loyalty app.

First, I create two FIFO queues in the SQS console, leaving all options to their defaults:

  • The customer.fifo queue to process updates in my Customer management system.
  • The loyalty.fifo queue to help me collect and store customer updates for the Loyalty application.

In the SNS console, I create the updates.fifo topic. I select FIFO as type, and enable Content-based message deduplication.

Then,  I subscribe the customer.fifo and loyalty.fifo queues to the topic.

To be able to receive messages, I add a statement to the access policy of both queues granting the updates.fifo topic permissions to send messages to the queues. For example, for the customer.fifo queue the statement is:

{
  "Effect": "Allow",
  "Principal": {
    "Service": "sns.amazonaws.com"
  },
  "Action": "SQS:SendMessage",
  "Resource": "arn:aws:sqs:us-east-2:123412341234:customer.fifo",
  "Condition": {
    "ArnLike": {
      "aws:SourceArn": "arn:aws:sns:us-east-2:123412341234:updates.fifo"
    }
  }
}

Now, I use the SNS console to publish 4 messages in sequence. For all messages, I use the same message group ID. In this way, they are all in the same message group. The only part that is different is the message body, where I use in order:

  • Update One
  • Update Two
  • Update Three
  • Update One

In the SQS console, I see that only 3 messages have been delivered to the FIFO queues:

Why is that? When I created the FIFO topics, I enabled content-based deduplication. The 4 messages were sent within the 5-minute deduplication window. The last message has been recognized as a duplicate of the first one and has not been delivered to the subscribed queues.

Let’s see the actual messages in the queues. I use the AWS Command Line Interface (CLI) to receive the messages from SQS, and the jq command-line JSON processor to format the output and get only the Message in the Body.

Here are the messages in the customer.fifo queue:

$ aws sqs receive-message --queue-url https://sqs.us-east-2.amazonaws.com/123412341234/customer.fifo --max-number-of-messages 10 | jq '.Messages[].Body | fromjson | .Message'

"Update One"
"Update Two"
"Update Three"

And these are the messages in the loyalty.fifo queue:

$ aws sqs receive-message --queue-url https://sqs.us-east-2.amazonaws.com/123412341234/loyalty.fifo --max-number-of-messages 10 | jq '.Messages[].Body | fromjson | .Message'

"Update One"
"Update Two"
"Update Three"

As expected, the 3 messages with unique content have been delivered to both queues in the same order as they were sent.

Available Now
You can use SNS FIFO topics in all commercial regions. You can process up to 300 transactions per second (TPS) per FIFO topic or FIFO queue. With SNS, you pay only for what you use, you can find more information in the pricing page.

To learn more, please see the documentation.

Danilo

Via AWS News Blog https://ift.tt/1EusYcK

Amazon Prime Day 2020 – Powered by AWS

Tipped off by a colleague in Denmark, I bought the LEGO Star Wars Stormtrooper Helmet, which turned out to be a Prime Day best-seller!

As I like to do every year, I would like to share a few of the many ways that AWS helped to make Prime Day a reality for our customers. Back in 2016 I wrote How AWS Powered Amazon’s Biggest Day Ever to describe how we plan for Prime Day and that post is still informative and relevant.

This time around I would like to focus on four ways that AWS helped to support Prime Day: Amazon Live and IVS, Infrastructure Event Management, Storage, and Content Delivery.

Amazon Live and IVS on Prime Day
Throughout Prime Day 2020, Amazon customers were able to shop from livestreams through Amazon Live. Shoppers were also able to use live chat to interact with influencers and hosts in real time. They were able to ask questions, share their experiences, and get a better feel for products of interest to them.

Amazon Live helped customers learn more about products and take advantage of top deals by counting down to Deal Reveals and sharing live product demonstrations. Anitta, Russell Wilson, and Ciara curated Prime Day deals as did author Elizabeth Gilbert. In addition, influencers including @SheaWhitney, @ShopDandy, and @TheDealGuy shared their top product picks with customers. In total, there were over 1,200 live streams and tens of thousands of chat messages on Amazon Live during Prime Day.

To deliver these enhanced shopping experiences for customers and for creators, low latency video is essential. It enables Amazon Live to synchronize the products featured in the live video with the products displayed in the carousel at the bottom of the video player. Low latency also allows the livestream hosts to answer customer questions in real-time. And, of course, on Prime Day in particular, all of this needed to happen at scale.

In order to do this, the Amazon Live team made use of the newly launched Amazon Interactive Video Service (IVS). As Martin explains in his recent post (Amazon Interactive Video Service – Add Live Video to Your Apps and Websites), this is a managed live streaming service that supports the creation of interactive, low-latency video experiences. It uses the same technology that powers Twitch, and allows you to deliver live content with very low latency, often three seconds or less (20 to 30 seconds is more common).

Infrastructure Event Management
AWS Infrastructure Event Management (IEM) helps our customers to plan and run large-scale business-critical events.This program is included in the Enterprise Support plan and is available to Business Support customers for an additional fee. IEM includes an assessment of operational readiness, identification and mitigation of risks, and the confidence to run an event with AWS experts standing by and ready to help.

This year, the TAMs (Technical Account Managers) that support the IEM program created a Control Room that was 100% virtual. A combination of Slack channels and Amazon Chime bridges empowered AWS service teams, AWS support, IT support, and Amazon Customer Reliability Engineering (thousands of people in all) to communicate and collaborate in real time.

Storage for Prime Day
Amazon DynamoDB powers multiple high-traffic Amazon properties and systems including Alexa, the Amazon.com sites, and all Amazon fulfillment centers. Over the course of the 66-hour Prime Day, these sources made 16.4 trillion calls to the DynamoDB API, peaking at 80.1 million requests per second.

On the block storage side, Amazon Elastic Block Store (EBS) added 241 petabytes of storage in preparation for Prime Day; the resulting fleet handled 6.2 trillion requests per day and transferred 563 petabytes per day.

Content Delivery for Prime Day
Amazon CloudFront played an important role as always, serving up web and streamed content to a world-wide audience. CloudFront handled over 280 million HTTP requests per minute, a total of 450 billion requests across all of the Amazon.com sites.

Jeff;

Via AWS News Blog https://ift.tt/1EusYcK

Wednesday, October 21, 2020

Public Preview – AWS Distro for OpenTelemetry

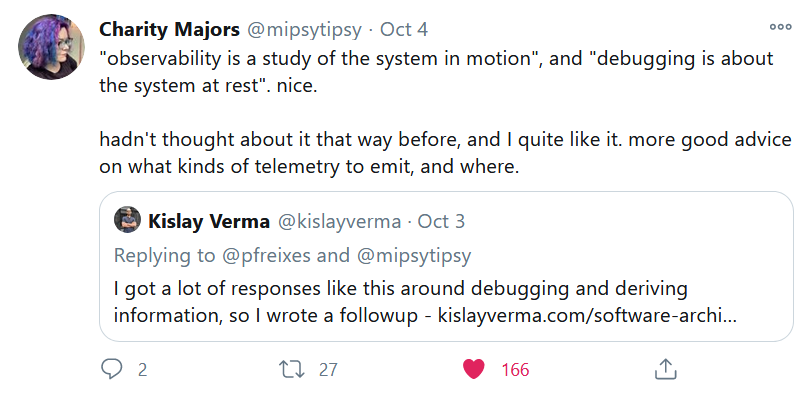
It took me a while to figure out what observability was all about. A year or two I asked around and my colleagues told me that I needed to follow Charity Majors and to read her blog (done, and done). Just this week, Charity tweeted:

Kislay’s tweet led to his blog post, Observing is not Debugging, which I found very helpful. As Charity noted, Kislay tells us that Observability is a study of the system in motion.

Today’s large-scale distributed applications and systems are effectively always in motion. Whether serving web requests, processing streams of data or handling events, something is always happening. At world-scale, looking at individual requests or events is not always feasible. Instead, it is necessary to take a statistical approach and to watch how well a system is working, instead of simply waiting for a total failure.

New AWS Distro for OpenTelemetry
Today we are launching a preview of AWS Distro for OpenTelemetry. We are part of the Cloud Native Computing Foundation (CNCF)’s OpenTelemetry community, working to define an open standard for the collection of distributed traces and metrics. AWS Distro for OpenTelemetry is a secure and supported distribution of the APIs, libraries, agents, and collectors defined in the OpenTelemetry Specification.

One of the coolest features of the toolkit is auto instrumentation. Starting with Java and in the works for other languages and environments (.NET and JavaScript are next), the auto-instrumentation agent identifies the frameworks and languages used by your application and automatically instruments them to collect and forward metrics and traces.

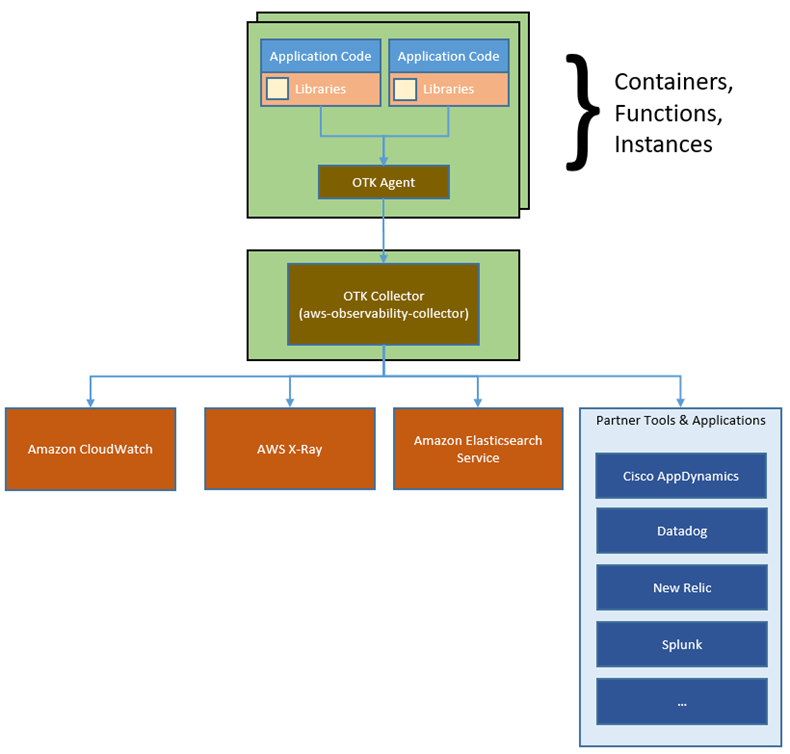
Here’s how all of the pieces fit together:

The AWS Observability Collector runs within your environment. It can be launched as a sidecar or daemonset for EKS, a sidecar for ECS, or an agent on EC2. You configure the metrics and traces that you want to collect, and also which AWS services to forward them to. You can set up a central account for monitoring complex multi-account applications, and you can also control the sampling rate (what percentage of the raw data is forwarded and ultimately stored).

Partners in Action
You can make use of AWS and partner tools and applications to observe, analyze, and act on what you see. We’re working with Cisco AppDynamics, Datadog, New Relic, Splunk, and other partners and will have more information to share during the preview.

Things to Know
The preview of the AWS Distro for OpenTelemetry is available now and you can start using it today. In addition to the .NET and JavaScript support that I mentioned earlier, we plan to support Python, Ruby, Go, C++, Erlang, and Rust as well.

This is an open source project and welcome your pull requests! We will be tracking the upstream repository and plan to release a fresh version of the toolkit quarterly.

Jeff;

PS – Be sure to sign up for our upcoming webinar, Observability at AWS and AWS Distro for OpenTelemetry Deep Dive.


Via AWS News Blog https://ift.tt/1EusYcK

Tuesday, October 20, 2020

New – Use AWS PrivateLink to Access AWS Lambda Over Private AWS Network

AWS Lambda is a serverless computing service that lets you run code without provisioning or managing servers. You simply upload your code and Lambda does all the work to execute and scale your code for high availability. Many AWS customers today use this serverless computing platform to significantly improve their productivity while developing and operating applications.

Today, I am happy to announce that AWS Lambda now supports AWS PrivateLink which lets you invoke Lambda functions securely from inside your virtual private cloud (VPC) or on-premises data centers without exposing traffic to the public Internet.

Until now, in order to call Lambda functions, a VPC required an Internet Gateway, network address translation (NAT) gateway, and/or public IP address. With this update, PrivateLink routes the call through the AWS private network, eliminating the need for Internet access. Additionally, you can now call the Lambda API directly from your on-premises data centers by connecting to a VPC using AWS Direct Connect or AWS VPN Connections.

Some customers wanted to manage and call Lambda functions from a VPC that doesn’t have internet access due to internal IT governance requirements. With this update, you will be able to use Lambda. Also, customer who have maintained NAT Gateway to access Lambda from a VPC, can use a VPC endpoint instead of the NAT Gateway thus saving the cost of NAT Gateway. Security is further improved because you no longer need to allow Internet access to your VPC to call Lambda functions, and network architecture becomes more simple, and easily manageable. Previously, in the case of VPC-enabled Lambda function calling another Lambda function, such a call had to go through a NAT GW but now customer’s can use a VPC endpoint instead.

How to Get Started With AWS PrivateLink

AWS PrivateLink uses an elastic network interface called the “Interface VPC endpoint” to act as an entry point for traffic targeting AWS services. Interface endpoints limit all network traffic to AWS internal network and provide secure access to your services. The Interface VPC endpoint is a redundant, highly available VPC component that has a private IP address and is scaled horizontally.

Getting Started Using the AWS Management Console

To get started, you can use the AWS Management Console, AWS CLI, or AWS CloudFormation. In this first example, I’ll show the Management Console.

First, you access the VPC management console, and click “Endpoints.”

Click “Create Endpoint” button.

Type “lambda” in the search bar, and you’ll see Service Name. Select it, and choose the VPC where you want to create the interface endpoint.

After that, you are prompted to specify subnets where you may want to create endpoints.

If you want, you can set your own DNS name to the endpoint with Amazon Route53 private hosted zones when you enable “Enable DNS name” option. With this option enabled, any request for Lambda functions in your public subnet can not invoke Lambda via your Internet Gateway, and communications has to go through via VPC endpoints in Private subnet.

Next, specify “Security Group” for protocols, port, and source/target IP address control.

Then, set the policy to control who has access to the VPC endpoint. By default, “Full Access” is selected, but we always recommend you first grant access only to the minimum necessary principal; you can modify this later.

Following is a sample you can customize to create your “Policy.” With this sample, only the IAM user “MyUser” can invoke a Lambda function of “my-function.”

{
    "Statement": [
        {
            "Principal": "arn:aws:iam::123412341234:user/MyUser",
            "Action": [
                "lambda:InvokeFunction"
            ],
            "Effect": "Allow",
            "Resource": [
               "arn:aws:lambda:us-east-2:123456789012:function:my-function:1”
            ]
        }
    ]
}

Now, it’s time for the final step. Click the “Create endpoint” button. You’ll see the success dialog shown below.

Now you can invoke Lambda functions with the endpoint DNS name. You can also invoke Lambda functions from another VPC connected to the original VPC via VPC peering, AWS Transit Gateway, or you can even do so from another AWS account.

Getting Started Using the AWS Command Line Interface (CLI)

Using AWS CLI is more precise and easy if you already have the AWS CLI environment. 

aws ec2 create-vpc-endpoint --vpc-id vpc-ec43eb89 \
        --vpc-endpoint-type Interface --service-name lambda.<region code>.amazonaws.com \
        --subnet-id subnet-abababab --security-group-id sg-1a2b3c4d

Available Today

AWS PrivateLink support by AWS Lambda is now available in all AWS Regions except for Africa (Cape Town) and Europe (Milan). Supporting those regions are on our roadmap, and is coming soon. Standard AWS PrivateLink pricing apply to Lambda interface endpoints. You will be billed each hour the interface endpoint is provisioned in each Availability Zone, and for the data processed through the interface endpoint. No additional fee is required for AWS Lambda. See the AWS PrivateLink pricing page, and documentation for more detail.

– Kame;


Via AWS News Blog https://ift.tt/1EusYcK

How to manage cloud migration remotely

It’s Monday morning standup, and 22 faces spread across your screen on yet another Zoom call. The focus is on the day’s tasks, as well as looking at problems that need solving.  

Unique to this experience is that just seven months ago, all of these faces were present in the same conference room, before COVID-19 sent them home to work remotely. 

One of the more common question I get lately is how to manage a remote migration team and do so without allowing schedules to slip? It’s really not as hard as it sounds; indeed many aspects are easier. Let me offer some advice to those who are tasked with managing remote teams and those who are on remote teams.  

To read this article in full, please click here

Friday, October 16, 2020

3 unexpected predictions for cloud computing next year

It’s that time of the year when PR folk promote their clients as somebody who can make predictions for 2021 that all should regard. I’m often taken back by the obvious nature of the assertions, such as “cloud computing will continue to grow” or “there will be an expanded need for cloud security.” 

Okay, that’s not at all helpful.

The reality is that although we can see much of the future based on obvious past and current patterns, other portions of the cloud computing market are much tougher to forecast. Enterprises won’t see some trends until it’s too late. Here are three to at least put on your radar:

To read this article in full, please click here

Thursday, October 15, 2020

New – Amazon RDS on Graviton2 Processors

I recently wrote a post to announce the availability of M6g, R6g and C6g families of instances on Amazon Elastic Compute Cloud (EC2). These instances offer better cost-performance ratio than their x86 counterparts. They are based on AWS-designed AWS Graviton2 processors, utilizing 64-bit Arm Neoverse N1 cores.

Starting today, you can also benefit from better cost-performance for your Amazon Relational Database Service (RDS) databases, compared to the previous M5 and R5 generation of database instance types, with the availability of AWS Graviton2 processors for RDS. You can choose between M6g and R6g instance families and three database engines (MySQL 8.0.17 and higher, MariaDB 10.4.13 and higher, and PostgreSQL 12.3 and higher).

M6g instances are ideal for general purpose workloads. R6g instances offer 50% more memory than their M6g counterparts and are ideal for memory intensive workloads, such as Big Data analytics.

Graviton2 instances provide up to 35% performance improvement and up to 52% price-performance improvement for RDS open source databases, based on internal testing of workloads with varying characteristics of compute and memory requirements.

Graviton2 instances family includes several new performance optimizations such as larger L1 and L2 caches per core, higher Amazon Elastic Block Store (EBS) throughput than comparable x86 instances, fully encrypted RAM, and many others as detailed on this page. You can benefit from these optimizations with minimal effort, by provisioning or migrating your RDS instances today.

RDS instances are available in multiple configurations, starting with 2 vCPUs, with 8 GiB memory for M6g, and 16 GiB memory for R6g with up to 10 Gbps of network bandwidth, giving you new entry-level general purpose and memory optimized instances. The table below shows the list of instance sizes available for you:

Instance Size vCPU Memory (GiB) Dedicated EBS Bandwidth (Mbps) Network Bandwidth
(Gbps)
M6g R6g
large 2 8 16 Up to 4750 Up to 10
xlarge 4 16 32 Up to 4750 Up to 10
2xlarge 8 32 64 Up to 4750 Up to 10
4xlarge 16 64 128 4750 Up to 10
8xlarge 32 128 256 9000 12
12xlarge 48 192 384 13500 20
16xlarge 64 256 512 19000 25

Let’s Start Your First Graviton2 Based Instance
To start a new RDS instance, I use the AWS Management Console or the AWS Command Line Interface (CLI), just like usual, and select one of the db.m6g or db.r6ginstance types (this page in the documentation has all the details).

RDS Launch Graviton2 instance

Using the CLI, it would be:

aws rds create-db-instance
 --region us-west-2 \
 --db-instance-identifier $DB_INSTANCE_NAME \
 --db-instance-class db.m6g.large \
 --engine postgres \
 --engine-version 12.3 \
 --allocated-storage 20 \
 --master-username $MASTER_USER \
 --master-user-password $MASTER_PASSWORD

The CLI confirms with:

{
    "DBInstance": {
        "DBInstanceIdentifier": "newsblog",
        "DBInstanceClass": "db.m6g.large",
        "Engine": "postgres",
        "DBInstanceStatus": "creating",
...
}

Migrating to Graviton2 instances is easy, in the AWS Management Console, I select my database and I click Modify.

Modify RDS database

The I select the new DB instance class:

modify db instance

Or, using the CLI, I can use the modify-db-instance API call.

There is a short service interruption happening when you switch instance type. By default, the modification will happen during your next maintenance window, unless you enable the ApplyImmediately option.

You can provision new or migrate to Graviton2 Amazon Relational Database Service (RDS) instances in all regions where EC2 M6g and R6g are available : US East (N. Virginia), US East (Ohio), US West (Oregon), Asia Pacific (Mumbai), Asia Pacific (Singapore), Asia Pacific (Sydney), Asia Pacific (Tokyo), Europe (Ireland), and Europe (Frankfurt) AWS Regions.

As usual, let us know your feedback on the AWS Forum or through your usual AWS contact.

-- seb Via AWS News Blog https://ift.tt/1EusYcK

Friday, October 9, 2020

Static versus dynamic cloud migration

It’s 9:00 AM on a Wednesday. You’re in the boardroom giving a status update on the latest migration project that will remove most of the vulnerabilities found during the recent pandemic. This is the third migration project, all less than 100 workloads and 10 data sets. All have taken place in parallel, and all leverage different cloud migration teams.

Company leadership notes that the metrics were very different between the projects. Project One shows nearly 80 percent efficiency in terms of code refactoring, testing, deployment, security implementation, etc. The others were closer to 30 and 40 percent. Why the differences? 

Most efficiency issues arise from dynamic versus static migration approaches and tools. Most people who currently do cloud migrations gravitate toward the specific processes, approaches, and migration tool suites that worked for past projects. This static approach to cloud migration forces a specific set of processes and tools onto a wide variety of migration projects and problem domains. The misuse of specific processes and tools as generic solutions often leads to failure. 

To read this article in full, please click here

Wednesday, October 7, 2020

New – Redis 6 Compatibility for Amazon ElastiCache

After the last Redis 5.0 compatibility for Amazon ElastiCache, there has been lots of improvements to Amazon ElastiCache for Redis including upstream supports such as 5.0.6.

Earlier this year, we announced Global Datastore for Redis that lets you replicate a cluster in one region to clusters in up to two other regions. Recently we improved your ability to monitor your Redis fleet by enabling 18 additional engine and node-level CloudWatch metrics. Also, we added support for resource-level permission policies, allowing you to assign AWS Identity and Access Management (IAM) principal permissions to specific ElastiCache resource or resources.

Today, I am happy to announce Redis 6 compatibility to Amazon ElastiCache for Redis. This release brings several new and important features to Amazon ElastiCache for Redis:

  • Managed Role-Based Access Control – Amazon ElastiCache for Redis 6 now provides you with the ability to create and manage users and user groups that can be used to set up Role-Based Access Control (RBAC) for Redis commands. You can now simplify your architecture while maintaining security boundaries by having several applications use the same Redis cluster without being able to access each other’s data. You can also take advantage of granular access control and authorization to create administration and read-only user groups. Amazon ElastiCache enhances the new Access Control Lists (ACL) introduced in open source Redis 6 to provide a managed RBAC experience, making it easy to set up access control across several Amazon ElastiCache for Redis clusters.
  • Client-Side Caching – Amazon ElastiCache for Redis 6 comes with server-side enhancements to deliver efficient client-side caching to further improve your application performance. Redis clusters now support client-side caching by tracking client requests and sending invalidation messages for data stored on the client. In addition, you can also take advantage of a broadcast mode that allows clients to subscribe to a set of notifications from Redis clusters.
  • Significant Operational Improvements – This release also includes several enhancements that improve application availability and reliability. Specifically, Amazon ElastiCache has improved replication under low memory conditions, especially for workloads with medium/large sized keys, by reducing latency and the time it takes to perform snapshots. Open source Redis enhancements include improvements to expiry algorithm for faster eviction of expired keys and various bug fixes.

Note that open source Redis 6 also announced support for encryption-in-transit, a capability that is already available in Amazon ElastiCache for Redis 4.0.10 onwards. This release of Amazon ElastiCache for Redis 6 does not impact Amazon ElastiCache for Redis’ existing support for encryption-in-transit.

In order to apply RBAC to a new or existing Redis 6 cluster, we first need to ensure you have a user and user group created. We’ll review the process to do this below.

Using Role-Based Access Control – How it works
An alternative to Authenticating Users with the Redis AUTH Command, Amazon ElastiCache for Redis 6 offers Role-Based Access Control (RBAC). With RBAC, you create users and assign them specific permissions via an Access String.

If you want to create, modify, and delete users and user groups, you will need to select to the User Management and User Group Management sections in the ElastiCache console.

ElastiCache will automatically configure a default user with user ID and user name “default”, and then you can add it or new created users to new groups in User Group Management.

If you want to change the default user with your own password and access setting, you need to create a new user with the username set to “default” and can then swap it with the original default user. We recommend using your own strong password for a default user.

The following example shows how to swap the original default user with another default that has a modified access string via AWS CLI.

$ aws elasticache create-user \
 --user-id "new-default-user" \
 --user-name "default" \
 --engine "REDIS" \
 --passwords "a-str0ng-pa))word" \ 
 --access-string "off +get ~keys*"

Create a user group and add the user you created previously.

$ aws elasticache create-user-group \
  --user-group-id "new-default-group" \
  --engine "REDIS" \
  --user-ids "default"

Swap the new default user with the original default user.

$ aws elasticache modify-user-group \
    --user-group-id "new-default-group" \
    --user-ids-to-add "new-default-user" \
    --user-ids-to-remove "default"

Also, you can modify a user’s password or change its access permissions using modify-user command, or remove a specific user using delete-user command. It will be removed from any user groups to which it belongs.

Similarly you can modify a user group by adding new users and/or removing current users using modify-user-group command, or delete a user group using delete-user-group command. Note that the user group itself, not the users belonging to the group, will be deleted.

Once you have created a user group and added users, you can assign the user group to a replication group, or migrate between Redis AUTH and RBAC. For more information, see the documentation in detail.

Redis 6 cluster for ElastiCache – Getting Started
As usual, you can use the ElastiCache Console, CLI, APIs, or a CloudFormation template to create to new Redis 6 cluster. I’ll use the Console, choose Redis from the navigation pane and click Create with the following settings:

Select “Encryption in-transit” checkbox to ensure you can see the “Access Control” options. You can select an option of Access Control either User Group Access Control List by RBAC features or Redis AUTH default user. If you select RBAC, you can choose one of the available user groups.

My cluster is up and running within minutes. You can also use the in-place upgrade feature on existing cluster. By selecting the cluster, click Action and Modify. You can change the Engine Version from 5.0.6-compatible engine to 6.x.

Now Available
Amazon ElastiCache for Redis 6 is now available in all AWS regions. For a list of ElastiCache for Redis supported versions, refer to the documentation. Please send us feedback either in the AWS forum for Amazon ElastiCache or through AWS support, or your account team.

Channy;

Via AWS News Blog https://ift.tt/1EusYcK

Amazon SageMaker Continues to Lead the Way in Machine Learning and Announces up to 18% Lower Prices on GPU Instances

Since 2006, Amazon Web Services (AWS) has been helping millions of customers build and manage their IT workloads. From startups to large enterprises to public sector, organizations of all sizes use our cloud computing services to reach unprecedented levels of security, resiliency, and scalability. Every day, they’re able to experiment, innovate, and deploy to production in less time and at lower cost than ever before. Thus, business opportunities can be explored, seized, and turned into industrial-grade products and services.

As Machine Learning (ML) became a growing priority for our customers, they asked us to build an ML service infused with the same agility and robustness. The result was Amazon SageMaker, a fully managed service launched at AWS re:Invent 2017 that provides every developer and data scientist with the ability to build, train, and deploy ML models quickly.

Today, Amazon SageMaker is helping tens of thousands of customers in all industry segments build, train and deploy high quality models in production: financial services (Euler Hermes, Intuit, Slice Labs, Nerdwallet, Root Insurance, Coinbase, NuData Security, Siemens Financial Services), healthcare (GE Healthcare, Cerner, Roche, Celgene, Zocdoc), news and media (Dow Jones, Thomson Reuters, ProQuest, SmartNews, Frame.io, Sportograf), sports (Formula 1, Bundesliga, Olympique de Marseille, NFL, Guiness Six Nations Rugby), retail (Zalando, Zappos, Fabulyst), automotive (Atlas Van Lines, Edmunds, Regit), dating (Tinder), hospitality (Hotels.com, iFood), industry and manufacturing (Veolia, Formosa Plastics), gaming (Voodoo), customer relationship management (Zendesk, Freshworks), energy (Kinect Energy Group, Advanced Microgrid Systems), real estate (Realtor.com), satellite imagery (Digital Globe), human resources (ADP), and many more.

When we asked our customers why they decided to standardize their ML workloads on Amazon SageMaker, the most common answer was: “SageMaker removes the undifferentiated heavy lifting from each step of the ML process.” Zooming in, we identified five areas where SageMaker helps them most.

#1 – Build Secure and Reliable ML Models, Faster
As many ML models are used to serve real-time predictions to business applications and end users, making sure that they stay available and fast is of paramount importance. This is why Amazon SageMaker endpoints have built-in support for load balancing across multiple AWS Availability Zones, as well as built-in Auto Scaling to dynamically adjust the number of provisioned instances according to incoming traffic.

For even more robustness and scalability, Amazon SageMaker relies on production-grade open source model servers such as TensorFlow Serving, the Multi-Model Server, and TorchServe. A collaboration between AWS and Facebook, TorchServe is available as part of the PyTorch project, and makes it easy to deploy trained models at scale without having to write custom code.

In addition to resilient infrastructure and scalable model serving, you can also rely on Amazon SageMaker Model Monitor to catch prediction quality issues that could happen on your endpoints. By saving incoming requests as well as outgoing predictions, and by comparing them to a baseline built from a training set, you can quickly identify and fix problems like missing features or data drift.

Says Aude Giard, Chief Digital Officer at Veolia Water Technologies: “In 8 short weeks, we worked with AWS to develop a prototype that anticipates when to clean or change water filtering membranes in our desalination plants. Using Amazon SageMaker, we built a ML model that learns from previous patterns and predicts the future evolution of fouling indicators. By standardizing our ML workloads on AWS, we were able to reduce costs and prevent downtime while improving the quality of the water produced. These results couldn’t have been realized without the technical experience, trust, and dedication of both teams to achieve one goal: an uninterrupted clean and safe water supply.” You can learn more in this video.

#2 – Build ML Models Your Way
When it comes to building models, Amazon SageMaker gives you plenty of options. You can visit AWS Marketplace, pick an algorithm or a model shared by one of our partners, and deploy it on SageMaker in just a few clicks. Alternatively, you can train a model using one of the built-in algorithms, or your own code written for a popular open source ML framework (TensorFlow, PyTorch, and Apache MXNet), or your own custom code packaged in a Docker container.

You could also rely on Amazon SageMaker AutoPilot, a game-changing AutoML capability. Whether you have little or no ML experience, or you’re a seasoned practitioner who needs to explore hundreds of datasets, SageMaker AutoPilot takes care of everything for you with a single API call. It automatically analyzes your dataset, figures out the type of problem you’re trying to solve, builds several data processing and training pipelines, trains them, and optimizes them for maximum accuracy. In addition, the data processing and training source code is available in auto-generated notebooks that you can review, and run yourself for further experimentation. SageMaker Autopilot also now creates machine learning models up to 40% faster with up to 200% higher accuracy, even with small and imbalanced datasets.

Another popular feature is Automatic Model Tuning. No more manual exploration, no more costly grid search jobs that run for days: using ML optimization, SageMaker quickly converges to high-performance models, saving you time and money, and letting you deploy the best model to production quicker.

NerdWallet relies on data science and ML to connect customers with personalized financial products“, says Ryan Kirkman, Senior Engineering Manager. “We chose to standardize our ML workloads on AWS because it allowed us to quickly modernize our data science engineering practices, removing roadblocks and speeding time-to-delivery. With Amazon SageMaker, our data scientists can spend more time on strategic pursuits and focus more energy where our competitive advantage is—our insights into the problems we’re solving for our users.” You can learn more in this case study.
Says Tejas Bhandarkar, Senior Director of Product, Freshworks Platform: “We chose to standardize our ML workloads on AWS because we could easily build, train, and deploy machine learning models optimized for our customers’ use cases. Thanks to Amazon SageMaker, we have built more than 30,000 models for 11,000 customers while reducing training time for these models from 24 hours to under 33 minutes. With SageMaker Model Monitor, we can keep track of data drifts and retrain models to ensure accuracy. Powered by Amazon SageMaker, Freddy AI Skills is constantly-evolving with smart actions, deep-data insights, and intent-driven conversations.

#3 – Reduce Costs
Building and managing your own ML infrastructure can be costly, and Amazon SageMaker is a great alternative. In fact, we found out that the total cost of ownership (TCO) of Amazon SageMaker over a 3-year horizon is over 54% lower compared to other options, and developers can be up to 10 times more productive. This comes from the fact that Amazon SageMaker manages all the training and prediction infrastructure that ML typically requires, allowing teams to focus exclusively on studying and solving the ML problem at hand.

Furthermore, Amazon SageMaker includes many features that help training jobs run as fast and as cost-effectively as possible: optimized versions of the most popular machine learning libraries, a wide range of CPU and GPU instances with up to 100GB networking, and of course Managed Spot Training which lets you save up to 90% on your training jobs. Last but not least, Amazon SageMaker Debugger automatically identifies complex issues developing in ML training jobs. Unproductive jobs are terminated early, and you can use model information captured during training to pinpoint the root cause.

Amazon SageMaker also helps you slash your prediction costs. Thanks to Multi-Model Endpoints, you can deploy several models on a single prediction endpoint, avoiding the extra work and cost associated with running many low-traffic endpoints. For models that require some hardware acceleration without the need for a full-fledged GPU, Amazon Elastic Inference lets you save up to 90% on your prediction costs. At the other end of the spectrum, large-scale prediction workloads can rely on AWS Inferentia, a custom chip designed by AWS, for up to 30% higher throughput and up to 45% lower cost per inference compared to GPU instances.

Lyft, one of the largest transportation networks in the United States and Canada, launched its Level 5 autonomous vehicle division in 2017 to develop a self-driving system to help millions of riders. Lyft Level 5 aggregates over 10 terabytes of data each day to train ML models for their fleet of autonomous vehicles. Managing ML workloads on their own was becoming time-consuming and expensive. Says Alex Bain, Lead for ML Systems at Lyft Level 5: “Using Amazon SageMaker distributed training, we reduced our model training time from days to couple of hours. By running our ML workloads on AWS, we streamlined our development cycles and reduced costs, ultimately accelerating our mission to deliver self-driving capabilities to our customers.

#4 – Build Secure and Compliant ML Systems
Security is always priority #1 at AWS. It’s particularly important to customers operating in regulated industries such as financial services or healthcare, as they must implement their solutions with the highest level of security and compliance. For this purpose, Amazon SageMaker implements many security features, making it compliant with the following global standards: SOC 1/2/3, PCI, ISO, FedRAMP, DoD CC SRG, IRAP, MTCS, C5, K-ISMS, ENS High, OSPAR, and HITRUST CSF. It’s also HIPAA BAA eligible.

Says Ashok Srivastava, Chief Data Officer, Intuit: “With Amazon SageMaker, we can accelerate our Artificial Intelligence initiatives at scale by building and deploying our algorithms on the platform. We will create novel large-scale machine learning and AI algorithms and deploy them on this platform to solve complex problems that can power prosperity for our customers.”

#5 – Annotate Data and Keep Humans in the Loop
As ML practitioners know, turning data into a dataset requires a lot of time and effort. To help you reduce both, Amazon SageMaker Ground Truth is a fully managed data labeling service that makes it easy to annotate and build highly accurate training datasets at any scale (text, image, video, and 3D point cloud datasets).

Says Magnus Soderberg, Director, Pathology Research, AstraZeneca: “AstraZeneca has been experimenting with machine learning across all stages of research and development, and most recently in pathology to speed up the review of tissue samples. The machine learning models first learn from a large, representative data set. Labeling the data is another time-consuming step, especially in this case, where it can take many thousands of tissue sample images to train an accurate model. AstraZeneca uses Amazon SageMaker Ground Truth, a machine learning-powered, human-in-the-loop data labeling and annotation service to automate some of the most tedious portions of this work, resulting in reduction of time spent cataloging samples by at least 50%.

Amazon SageMaker is Evaluated
The hundreds of new features added to Amazon SageMaker since launch are testimony to our relentless innovation on behalf of customers. In fact, the service was highlighted in February 2020 as the overall leader in Gartner’s Cloud AI Developer Services Magic Quadrant. Gartner subscribers can click here to learn more about why we have an overall score of 84/100 in their “Solution Scorecard for Amazon SageMaker, July 2020”, the highest rating among our peer group. According to Gartner, we met 87% of required criteria, 73% of preferred, and 85% of optional.

Announcing a Price Reduction on GPU Instances

To thank our customers for their trust and to show our continued commitment to make Amazon SageMaker the best and most cost-effective ML service, I’m extremely happy to announce a significant price reduction on all ml.p2 and ml.p3 GPU instances. It will apply starting October 1st for all SageMaker components and across the following regions: US East (N. Virginia), US East (Ohio), US West (Oregon), EU (Ireland), EU (Frankfurt), EU (London), Canada (Central), Asia Pacific (Singapore), Asia Pacific (Sydney), Asia Pacific (Seoul), Asia Pacific (Tokyo), Asia Pacific (Mumbai), and AWS GovCloud (US-Gov-West).

Instance Name Price Reduction
ml.p2.xlarge -11%
ml.p2.8xlarge -14%
ml.p2.16xlarge -18%
ml.p3.2xlarge -11%
ml.p3.8xlarge -14%
ml.p3.16xlarge -18%
ml.p3dn.24xlarge -18%

Getting Started with Amazon SageMaker
As you can see, there are a lot of exciting features in Amazon SageMaker, and I encourage you to try them out! Amazon SageMaker is available worldwide, so chances are you can easily get to work on your own datasets. The service is part of the AWS Free Tier, letting new users work with it for free for hundreds of hours during the first two months.

If you’d like to kick the tires, this tutorial will get you started in minutes. You’ll learn how to use SageMaker Studio to build, train, and deploy a classification model based on the XGBoost algorithm.

Last but not least, I just published a book named “Learn Amazon SageMaker“, a 500-page detailed tour of all SageMaker features, illustrated by more than 60 original Jupyter notebooks. It should help you get up to speed in no time.

As always, we’re looking forward to your feedback. Please share it with your usual AWS support contacts, or on the AWS Forum for SageMaker.

- Julien Via AWS News Blog https://ift.tt/1EusYcK

Tuesday, October 6, 2020

Survey finds cloud complexity increases challenges

Bridging the Cloud Transformation Gap is a report that evaluates the findings of Aptum’s Global Cloud Impact Study. Aptum’s annual study seeks the opinions of 400 senior IT decision makers. Keep in mind that these sponsored reports can be self-serving, either for lead generation or to promote a publisher’s dogma. This report is behind a registration wall. 

Despite possible biases, some good data points here address the intent to migrate to clouds versus the reality of doing so. I found the information realistic, considering that similar reports only cover the positive aspects of cloud migration. One of the more interesting bits of data points to the issue of complexity:

To read this article in full, please click here

Survey finds cloud complexity causes increased challenges

Bridging the Cloud Transformation Gap is a report that evaluates the findings of Aptum’s Global Cloud Impact Study. Aptum’s annual study seeks the opinions of 400 senior IT decision makers. Keep in mind that these sponsored reports can be self-serving, either for lead generation or to promote a publisher’s dogma. This report is behind a registration wall. 

Despite possible biases, some good data points here address the intent to migrate to clouds versus the reality of doing so. I found the information realistic, considering that similar reports only cover the positive aspects of cloud migration. One of the more interesting bits of data:

To read this article in full, please click here

Friday, October 2, 2020

Amazon S3 Update – Three New Security & Access Control Features

A year or so after we launched Amazon S3, I was in an elevator at a tech conference and heard a couple of developers use “just throw it into S3” as the answer to their data storage challenge. I remember that moment well because the comment was made so casually, and it was one of the first times that I fully grasped just how quickly S3 had caught on.

Since that launch, we have added hundreds of features and multiple storage classes to S3, while also reducing the cost to storage a gigabyte of data for a month by almost 85% (from $0.15 to $0.023 for S3 Standard, and as low as $0.00099 for S3 Glacier Deep Archive). Today, our customers use S3 to support many different use cases including data lakes, backup and restore, disaster recovery, archiving, and cloud-native applications.

Security & Access Control
As the set of use cases for S3 has expanded, our customers have asked us for new ways to regulate access to their mission-critical buckets and objects. We added IAM policies many years ago, and Block Public Access in 2018. Last year we added S3 Access Points (Easily Manage Shared Data Sets with Amazon S3 Access Points) to help you manage access in large-scale environments that might encompass hundreds of applications and petabytes of storage.

Today we are launching S3 Object Ownership as a follow-on to two other S3 security & access control features that we launched earlier this month. All three features are designed to give you even more control and flexibility:

Object Ownership – You can now ensure that newly created objects within a bucket have the same owner as the bucket.

Bucket Owner Condition – You can now confirm the ownership of a bucket when you create a new object or perform other S3 operations.

Copy API via Access Points – You can now access S3’s Copy API through an Access Point.

You can use all of these new features in all AWS regions at no additional charge. Let’s take a look at each one!

Object Ownership
With the proper permissions in place, S3 already allows multiple AWS accounts to upload objects to the same bucket, with each account retaining ownership and control over the objects. This many-to-one upload model can be handy when using a bucket as a data lake or another type of data repository. Internal teams or external partners can all contribute to the creation of large-scale centralized resources. With this model, the bucket owner does not have full control over the objects in the bucket and cannot use bucket policies to share objects, which can lead to confusion.

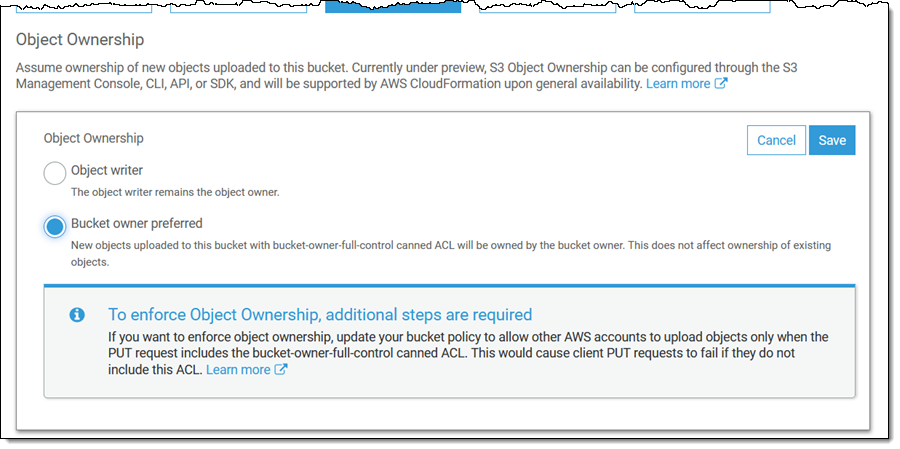
You can now use a new per-bucket setting to enforce uniform object ownership within a bucket. This will simplify many applications, and will obviate the need for the Lambda-powered self-COPY that has become a popular way to do this up until now. Because this setting changes the behavior seen by the account that is uploading, the PUT request must include the bucket-owner-full-control ACL. You can also choose to use a bucket policy that requires the inclusion of this ACL.

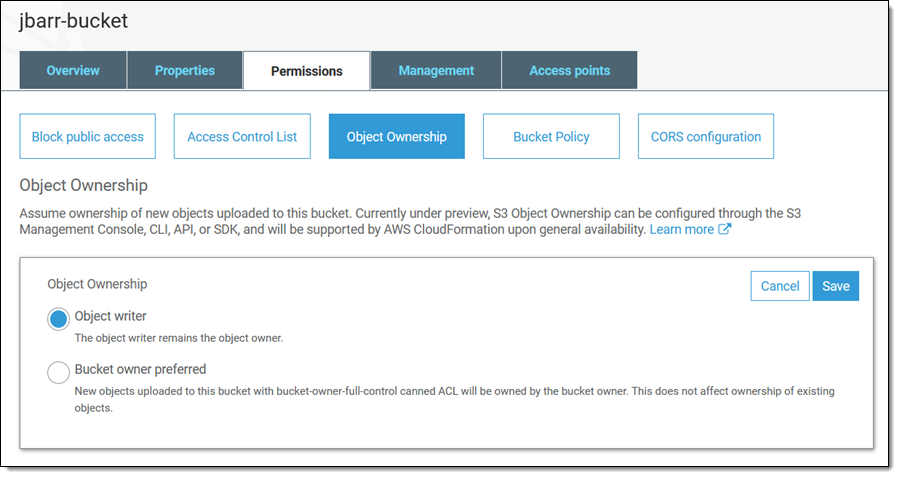
To get started, open the S3 Console, locate the bucket and view its Permissions, click Object Ownership, and Edit:

Then select Bucket owner preferred and click Save:

As I mentioned earlier, you can use a bucket policy to enforce object ownership (read About Object Ownership and this Knowledge Center Article to learn more).

Many AWS services deliver data to the bucket of your choice, and are now equipped to take advantage of this feature. S3 Server Access Logging, S3 Inventory, S3 Storage Class Analysis, AWS CloudTrail, and AWS Config now deliver data that you own. You can also configure Amazon EMR to use this feature by setting fs.s3.canned.acl to BucketOwnerFullControl in the cluster configuration (learn more).

Keep in mind that this feature does not change the ownership of existing objects. Also, note that you will now own more S3 objects than before, which may cause changes to the numbers you see in your reports and other metrics.

AWS CloudFormation support for Object Ownership is under development and is expected to be ready before AWS re:Invent.

Bucket Owner Condition
This feature lets you confirm that you are writing to a bucket that you own.

You simply pass a numeric AWS Account ID to any of the S3 Bucket or Object APIs using the expectedBucketOwner parameter or the x-amz-expected-bucket-owner HTTP header. The ID indicates the AWS Account that you believe owns the subject bucket. If there’s a match, then the request will proceed as normal. If not, it will fail with a 403 status code.

To learn more, read Bucket Owner Condition.

Copy API via Access Points
S3 Access Points give you fine-grained control over access to your shared data sets. Instead of managing a single and possibly complex policy on a bucket, you can create an access point for each application, and then use an IAM policy to regulate the S3 operations that are made via the access point (read Easily Manage Shared Data Sets with Amazon S3 Access Points to see how they work).

You can now use S3 Access Points in conjunction with the S3 CopyObject API by using the ARN of the access point instead of the bucket name (read Using Access Points to learn more).

Use Them Today
As I mentioned earlier, you can use all of these new features in all AWS regions at no additional charge.

Jeff;


Via AWS News Blog https://ift.tt/1EusYcK

3 cloud architecture secrets your cloud provider won’t tell you

Do you have an optimized architecture? This means that your solution maximizes efficiency and minimizes costs. You’ve selected the right cloud resources to configure the best storage systems, databases, and compute platforms—at least that’s what you think.

What I’m seeing out there, over and over again, is the selection of the wrong cloud resources for the wrong reasons. Cloud providers are pushing something that maximizes their revenue rather than being right for you. 

So, here are three cloud architecture secrets that you’ll never hear from your cloud provider:

To read this article in full, please click here