Monday, November 30, 2020

New – Use Amazon EC2 Mac Instances to Build & Test macOS, iOS, ipadOS, tvOS, and watchOS Apps

Throughout the course of my career I have done my best to stay on top of new hardware and software. As a teenager I owned an Altair 8800 and an Apple II. In my first year of college someone gave me a phone number and said “call this with modem.” I did, it answered “PENTAGON TIP,” and I had access to ARPANET!

I followed the emerging PC industry with great interest, voraciously reading every new issue of Byte, InfoWorld, and several other long-gone publications. In early 1983, rumor had it that Apple Computer would soon introduce a new system that was affordable, compact, self-contained, and very easy to use. Steve Jobs unveiled the Macintosh in January 1984 and my employer ordered several right away, along with a pair of the Apple Lisa systems that were used as cross-development hosts. As a developer, I was attracted to the Mac’s rich collection of built-in APIs and services, and still treasure my phone book edition of the Inside Macintosh documentation!

New Mac Instance
Over the last couple of years, AWS users have told us that they want to be able to run macOS on Amazon Elastic Compute Cloud (EC2). We’ve asked a lot of questions to learn more about their needs, and today I am pleased to introduce you to the new Mac instance!

The original (128 KB) Mac

Powered by Mac mini hardware and the AWS Nitro System, you can use Amazon EC2 Mac instances to build, test, package, and sign Xcode applications for the Apple platform including macOS, iOS, iPadOS, tvOS, watchOS, and Safari. The instances feature an 8th generation, 6-core Intel Core i7 (Coffee Lake) processor running at 3.2 GHz, with Turbo Boost up to 4.6 GHz. There’s 32 GiB of memory and access to other AWS services including Amazon Elastic Block Store (EBS), Amazon Elastic File System (EFS), Amazon FSx for Windows File Server, Amazon Simple Storage Service (S3), AWS Systems Manager, and so forth.

On the networking side, the instances run in a Virtual Private Cloud (VPC) and include ENA networking with up to 10 Gbps of throughput. With EBS-Optimization, and the ability to deliver up to 55,000 IOPS (16KB block size) and 8 Gbps of throughput for data transfer, EBS volumes attached to the instances can deliver the performance needed to support I/O-intensive build operations.

Mac instances run macOS 10.14 (Mojave) and 10.15 (Catalina) and can be accessed via command line (SSH) or remote desktop (VNC). The AMIs (Amazon Machine Images) for EC2 Mac instances are EC2-optimized and include the AWS goodies that you would find on other AWS AMIs: An ENA driver, the AWS Command Line Interface (CLI), the CloudWatch Agent, CloudFormation Helper Scripts, support for AWS Systems Manager, and the ec2-user account. You can use these AMIs as-is, or you can install your own packages and create custom AMIs (the homebrew-aws repo contains the additional packages and documentation on how to do this).

You can use these instances to create build farms, render farms, and CI/CD farms that target all of the Apple environments that I mentioned earlier. You can provision new instances in minutes, giving you the ability to quickly & cost-effectively build code for multiple targets without having to own & operate your own hardware. You pay only for what you use, and you get to benefit from the elasticity, scalability, security, and reliability provided by EC2.

EC2 Mac Instances in Action
As always, I asked the EC2 team for access to an instance in order to put it through its paces. The instances are available in Dedicated Host form, so I started by allocating a host:

$ aws ec2 allocate-hosts --instance-type mac1.metal \
  --availability-zone us-east-1a --auto-placement on \
  --quantity 1 --region us-east-1

Then I launched my Mac instance from the command line (console, API, and CloudFormation can also be used):

$ aws ec2 run-instances --region us-east-1 \
  --instance-type mac1.metal \
  --image-id  ami-023f74f1accd0b25b \
  --key-name keys-jbarr-us-east  --associate-public-ip-address

I took Luna for a very quick walk, and returned to find that my instance was ready to go. I used the console to give it an appropriate name:

Then I connected to my instance:

From here I can install my development tools, clone my code onto the instance, and initiate my builds.

I can also start a VNC server on the instance and use a VNC client to connect to it:

Note that the VNC protocol is not considered secure, and this feature should be used with care. I used a security group that allowed access only from my desktop’s IP address:

I can also tunnel the VNC traffic over SSH; this is more secure and would not require me to open up port 5900.

Things to Know
Here are a couple of fast-facts about the Mac instances:

AMI Updates – We expect to make new AMIs available each time Apple releases major or minor versions of each supported OS. We also plan to produce AMIs with updated Amazon packages every quarter.

Dedicated Hosts – The instances are launched as EC2 Dedicated Hosts with a minimum tenancy of 24 hours. This is largely transparent to you, but it does mean that the instances cannot be used as part of an Auto Scaling Group.

Purchase Models – You can run Mac instances On-Demand and you can also purchase a Savings Plan.

Apple M1 Chip – EC2 Mac instances with the Apple M1 chip are already in the works, and planned for 2021.

Launch one Today
You can start using Mac instances in the US East (N. Virginia), US East (Ohio), US West (Oregon), Europe (Ireland), and Asia Pacific (Singapore) Regions today, and check out this video for more information!

Jeff;


Via AWS News Blog https://ift.tt/1EusYcK

AWS On Air – re:Invent Weekly Streaming Schedule

Last updated: 11:00 am (PST), November 30

Join AWS On Air throughout re:Invent (Dec 1 – Dec 17) for daily livestreams with news, announcements, demos, and interviews with experts across industry and technology. To get started, head over to register for re:Invent. Then, after Andy Jassy’s keynote (Tuesday, Dec 1 at 8-11 am PST) check back here for the latest livestreams and where to tune-in.

Time (PST) Tuesday 12/1 Wednesday 12/2 Thursday (12/3) 12/3
12:00 AM
1:00 AM
2:00 AM Daily Recap (Italian) Daily Recap (Italian)
3:00 AM Daily Recap (German) Daily Recap (German)
4:00 AM Daily Recap (French) Daily Recap (French)
5:00 AM
6:00 AM Daily Recap
(Portuguese)
7:00 AM Daily Recap (Spanish)
8:00 AM
9:00 AM
9:30 AM
10:00 AM AWS What’s Next AWS What’s Next
10:30 AM AWS What’s Next AWS What’s Next
11:00 AM Voice of the Customer AWS What’s Next
11:30 AM Keynoteworthy Voice of the Customer Keynoteworthy
12:00 PM
12:30 PM
1:00 PM Industry Live Session – Energy AWS What’s Next
1:30 PM
2:00 PM AWS What’s Next AWS What’s Next AWS What’s Next
2:30 PM AWS What’s Next AWS What’s Next AWS What’s Next
3:00 PM Howdy Partner Howdy Partner
3:30 PM This Is My
Architecture
All In The Field This Is My
Architecture
4:00 PM
4:30 PM AWS What’s Next
5:00 PM Daily Recap (English) Daily Recap (English) Daily Recap (English)
5:30 PM Certification Quiz
Show
Certification Quiz
Show
Certification Quiz
Show
6:00 PM Industry Live
Sessions
Industry Live
Sessions
6:30 PM
7:00 PM Daily Recap
(Japanese)
Daily Recap
(Japanese)
Daily Recap
(Japanese)
8:00 PM Daily Recap (Korean) Daily Recap (Korean) Daily Recap (Korean)
9:00 PM
10:00 PM Daily Recap
(Cantonese)
Daily Recap
(Cantonese)
Daily Recap
(Cantonese)
11:00 PM

Show synopses

AWS What’s Next. Dive deep on the latest launches from re:Invent with AWS Developer Advocates and members of the service teams. See demos and get your questions answered live during the show.

Keynoteworthy. Join hosts Robert Zhu and Nick Walsh after each re:Invent keynote as they chat in-depth on the launches and announcements.

AWS Community Voices. Join us each Thursday at 11:00AM (PST) during re:Invent to hear from AWS community leaders who will share their thoughts on re:Invent and answer your questions live!

Howdy Partner. Howdy Partner highlights AWS Partner Network (APN) Partners so you can build with new tools and meet the people behind the companies. Experts and newcomers alike can learn how AWS Partner solutions enable you to drive faster results and how to pick the right tool when you need it.

re:Invent Recaps. Tune in for daily and weekly recaps about all things re:Invent—the greatest launches, events, and more! Daily recaps are available Tuesday through Thursday in English and Wednesday through Friday in Japanese, Korean, Italian, Spanish, French, and Portuguese. Weekly recaps are available Thursday in English.

This Is My Architecture.Designed for a technical audience, this popular series highlights innovative architectural solutions from customers and AWS Partners. Our hosts, Adrian DeLuca, Aarthi Raju, and Boaz Ziniman, will showcase the most interesting and creative elements of each architecture. #thisismyarchitecture

All in the Field: AWS Agriculture Live. Our expert AgTech hosts Karen Hildebrand and Matt Wolff review innovative applications that bring food to your table using AWS technology. They are joined by industry guests who walk through solutions from under the soil to low-earth-orbit satellites. #allinthefield

IoT All the Things: Special Projects Edition. Join expert hosts Erin McGill and Tim Mattison as they showcase exploratory “side projects” and early stage use cases from guest solution architects. These episodes let developers and IT professionals at any level jump in and experiment with AWS services in a risk-free environment. #alltheexperiments

Certification Quiz Show. Test your AWS knowledge on our fun, interactive AWS Certification Quiz Show! Each episode covers a different area of AWS knowledge that is ideal for preparing for AWS Certification. We also deep-dive into how best to gain AWS skills and how to become AWS Certified.

AWS Industry Live. Join AWS Industry Live for a comprehensive look into 14 different industries. Attendees will get a chance to join industry experts for a year in review, a review of common use cases, and learning about customer success stories from 2020.

Voice of the Customer. Tune in for one-on-one interviews with AWS industry customers to learn about their AWS journey, the technology that powers their products, and the innovation they are bringing to their industry.

Via AWS News Blog https://ift.tt/1EusYcK

Friday, November 27, 2020

re:Invent 2020 Liveblog: Andy Jassy Keynote

I’m always ready to try something new! This year, I am going to liveblog Andy Jassy‘s AWS re:Invent keynote address, which takes place from 8 a.m. to 11 a.m. on Tuesday, December 1 (PST). I’ll be updating this post every couple of minutes as I watch Andy’s address from the comfort of my home office. Stay tuned!

Jeff;


Via AWS News Blog https://ift.tt/1EusYcK

Tuesday, November 24, 2020

New – Attributes Based Access Control with AWS Single Sign On

Starting today, you can pass user attributes in the AWS session when your workforce sign-in into the cloud using AWS Single Sign-On. This gives you the centralized account access management of AWS Single Sign-On and ABAC, with the flexibility to use AWS SSO, Active Directory, or an external identity provider as your identity source. To learn more about the advantages of ABAC policies on AWS, you may read my previous blog post on the subject.

Overview
On one side, system administrators configure user attributes on the AWS Single Sign-On identity repository, or the managed Active Directory. System administrators may also configure an external identity provider, such as Okta, OneLogin or PingFederate to pass existing user attributes in the AWS sessions when their workforce federates into AWS. These attributes are known as session tags in AWS. On the other side, cloud administrators create fine-grained permissions policies such that your workforce get only access to cloud resources with matching resource tags.

Creating policies based on matching attributes instead of functional roles helps to reduce the number of distinct permissions and roles you must create and manage in your AWS environment. For example, when developers Bob from team red and Alice from team blue sign-in into AWS and assume the same AWS Identity and Access Management (IAM) role, they get distinct permissions to project resources tagged for their team. The identity system sends the team name attribute in the AWS session when Bob and Alice sign-in into AWS. The role’s permissions grant access to project resources with matching team name tags. Now, if Bob moves to team blue and system administrators update his team name in their identity provider directory, Bob automatically gets access to team blue’s project resources without requiring permissions updates in IAM.

How to Configure AWS SSO to Map User Attributes
Before to configure AWS SSO, there are two important points to highlight. First, ABAC will work with attributes from any identity source configured in AWS SSO : AWS SSO itself, a managed Active Directory, or an external identity provider. Second, there are two ways to pass attributes for access control to AWS SSO. Either you can pass attributes directly in the SAML assertion using the prefix https://aws.amazon.com/SAML/Attributes/AccessControl, or you can use attributes that are in the AWS SSO identity store. Those attributes are configured by your AWS SSO administrator for users created in AWS SSO, synchronized in from an Active Directory, or synchronized in from an external identity provider using automatic provisioning (SCIM).

For this demo, I choose to use an external identity provider and SCIM.

I can enable ABAC in AWS using AWS SSO with three steps:

Step 1: I configure my identity source with the associated user identities and attributes in the external identity provider. As of today, AWS SSO supports identity synchronization via SCIM with Azure AD, Okta, OneLogin, and PingFederate. Check this page to get an up-to-date list. The specifics depend on each identity provider.

Step 2: I configure the SCIM attributes I want to use for access control using the new Access Control Attributes global setting in the AWS SSO console or API. This screen allows me to select attributes for access control from the identity source I configured in step 1.

Attributes for Access Control

Step 3: I author ABAC rules through permission sets and resource-based policies using the attributes I configured in Step 2. More about this in a minute.

Now, when my workforce federates into an AWS account using SSO, they get access to their AWS resources based on matching attributes.

Attributes are passed as session tags. They are passed as comma-separated key:value pairs. The total character length of all the attributes together must be less than or equal to 460 characters.

What Does a Policy Look Like?
I now can use user attributes in my permission sets using the aws:PrincipalTag condition key when creating access control rules. For example, I can tag all the resources in my organization with their respective department name, and use a single permission set that grants developers access only to their department resources. Now, whenever developers federate into the AWS account, AWS SSO creates a department session tag with the value received from the identity provider. The security policies allow them to only get access to the resources in their respective department. As the team adds more developers and resources to their project, I only have to tag resources with the correct department name. As a result, as the organization adds new resources and developers to departments, developers can only manage resources aligned to their department without needing any permission updates.

An ABAC SSO permission set policy might look like this:

{
    "Version": "2012-10-17",
    "Statement": [
        {
            "Effect": "Allow",
            "Action": [ "ec2:DescribeInstances"],
            "Resource": "*"
        },
        {
            "Effect": "Allow",
            "Action": ["ec2:StartInstances","ec2:StopInstances"],
            "Resource": "*",
            "Condition": {
                "StringEquals": {
                    "ec2:ResourceTag/Department": "${aws:PrincipalTag/Department}"
                }
            }
        }
    ]
}

This policy allows anybody to DescribeInstances, but only users with a aws:PrincipalTag/Department tag’s value matching the EC2 instance ec2:ResourceTag/Department tag’s value are authorized to stop or to start instances.

I attach this policy to an AWS Account’s Permission Set. On the left part of the AWS Single Sign-On console, I click AWS Accounts and select the Permission sets tab. Then I click Create permission set. On the next screen, I select Create a customer permission set.

Create a custom permission set

I enter a name and description, I make sure Create a custom permissions policy is selected. Then I can copy/paste the previous policy allowing to start and stop EC2 instances when the department name tag value is equal to the person’s department name tag value.

Create Custom Policy for Permission Set

On the next screen, I enter some tags, then I review my configuration before clicking Create. Et voila, I am ready to go.

If you have existing federation configured with AWS Security Token Service, remember that external identity providers consider AWS SSO as a new application configuration. This means when you move from direct IAM federation to AWS SSO, you have to update your external identity provider configuration to connect with AWS SSO and to introduce attributes as session tags for this configuration.

Available Today
There is no additional charge to configure user attributes with AWS Single Sign-On. You can start to use it today in all AWS Regions where AWS SSO is available.

-- seb Via AWS News Blog https://ift.tt/1EusYcK

Introducing Amazon Managed Workflows for Apache Airflow (MWAA)

As the volume and complexity of your data processing pipelines increase, you can simplify the overall process by decomposing it into a series of smaller tasks and coordinate the execution of these tasks as part of a workflow. To do so, many developers and data engineers use Apache Airflow, a platform created by the community to programmatically author, schedule, and monitor workflows. With Airflow you can manage workflows as scripts, monitor them via the user interface (UI), and extend their functionality through a set of powerful plugins. However, manually installing, maintaining, and scaling Airflow, and at the same time handling security, authentication, and authorization for its users takes much of the time you’d rather use to focus on solving actual business problems.

For these reasons, I am happy to announce the availability of Amazon Managed Workflows for Apache Airflow (MWAA), a fully managed service that makes it easy to run open-source versions of Apache Airflow on AWS, and to build workflows to execute your extract-transform-load (ETL) jobs and data pipelines.

Airflow workflows retrieve input from sources like Amazon Simple Storage Service (S3) using Amazon Athena queries, perform transformations on Amazon EMR clusters, and can use the resulting data to train machine learning models on Amazon SageMaker. Workflows in Airflow are authored as Directed Acyclic Graphs (DAGs) using the Python programming language.

A key benefit of Airflow is its open extensibility through plugins which allows you to create tasks that interact with AWS or on-premise resources required for your workflows including AWS Batch, Amazon CloudWatch, Amazon DynamoDB, AWS DataSync, Amazon ECS and AWS Fargate, Amazon Elastic Kubernetes Service (EKS), Amazon Kinesis Firehose, AWS Glue, AWS Lambda, Amazon Redshift, Amazon Simple Queue Service (SQS), and Amazon Simple Notification Service (SNS).

To improve observability, Airflow metrics can be published as CloudWatch Metrics, and logs can be sent to CloudWatch Logs. Amazon MWAA provides automatic minor version upgrades and patches by default, with an option to designate a maintenance window in which these upgrades are performed.

You can use Amazon MWAA with these three steps:

  1. Create an environment – Each environment contains your Airflow cluster, including your scheduler, workers, and web server.
  2. Upload your DAGs and plugins to S3 – Amazon MWAA loads the code into Airflow automatically.
  3. Run your DAGs in Airflow – Run your DAGs from the Airflow UI or command line interface (CLI) and monitor your environment with CloudWatch.

Let’s see how this works in practice!

How to Create an Airflow Environment Using Amazon MWAA
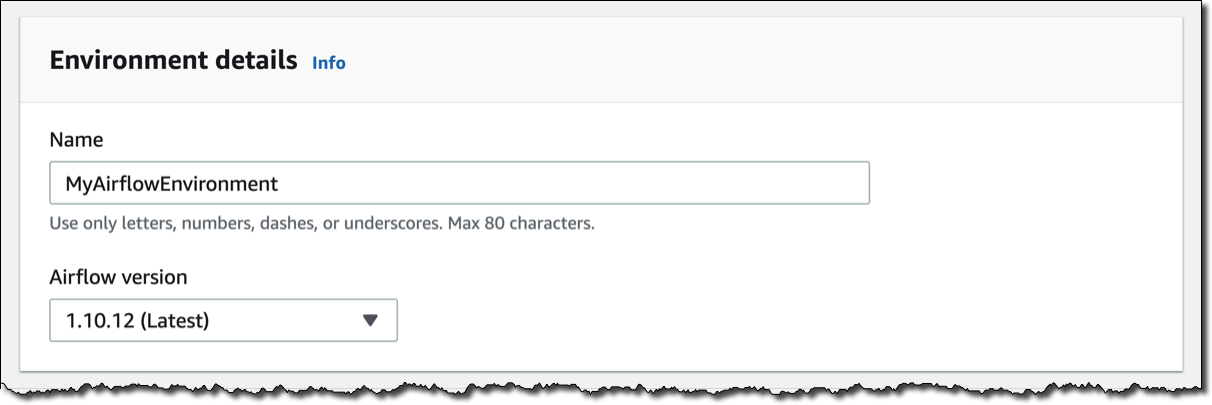
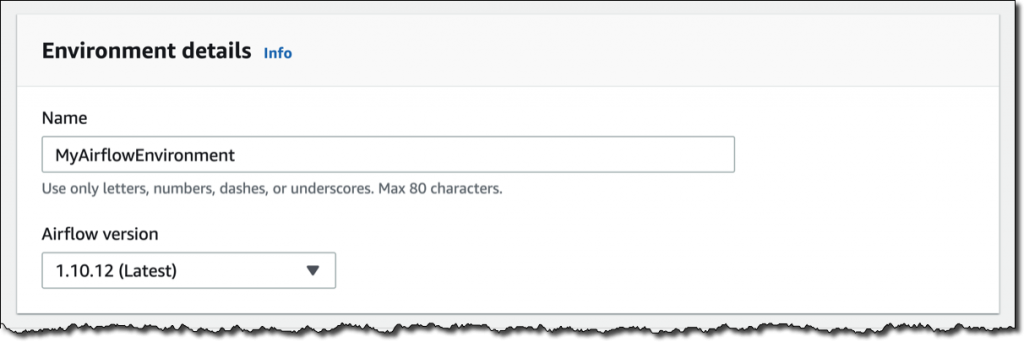
In the Amazon MWAA console, I click on Create environment. I give the environment a name and select the Airflow version to use.

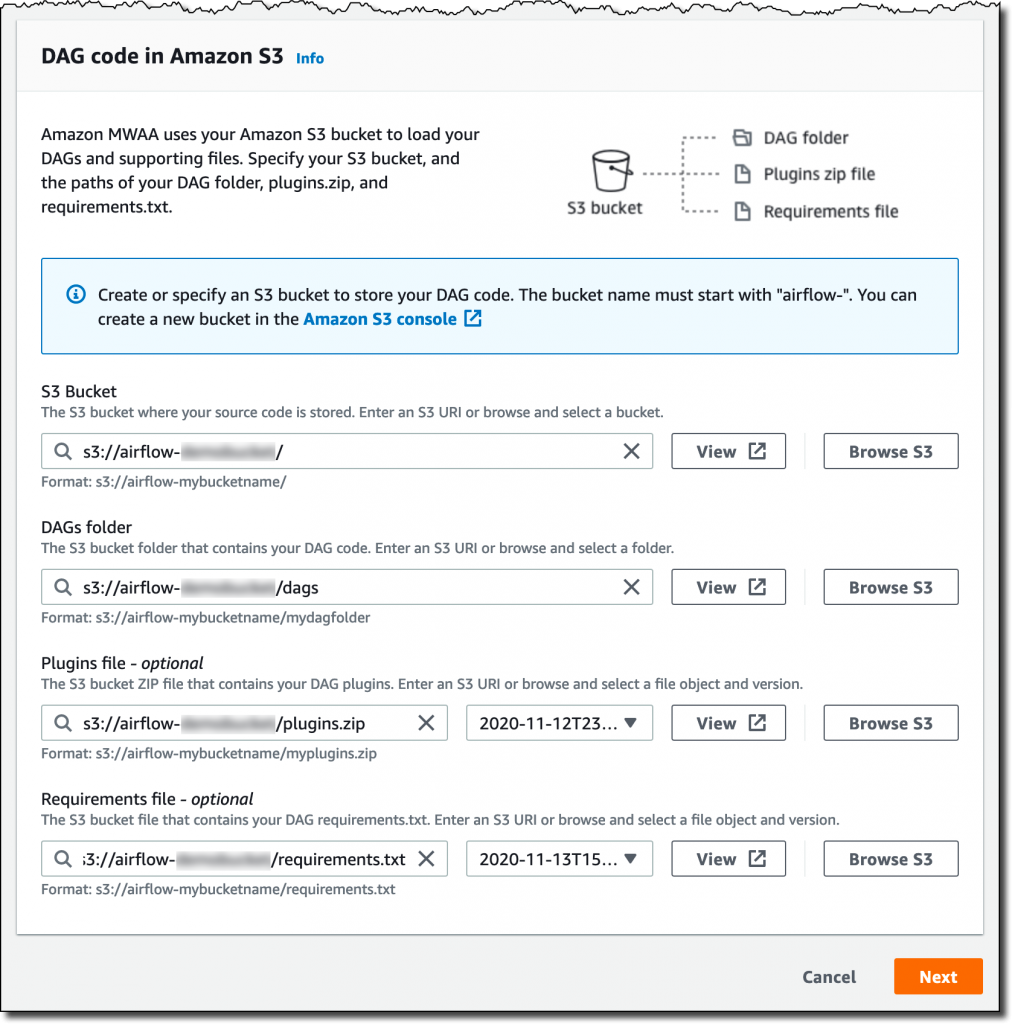
Then, I select the S3 bucket and the folder to load my DAG code. The bucket name must start with airflow-.

Optionally, I can specify a plugins file and a requirements file:

  • The plugins file is a ZIP file containing the plugins used by my DAGs.
  • The requirements file describes the Python dependencies to run my DAGs.

For plugins and requirements, I can select the S3 object version to use. In case the plugins or the requirements I use create a non-recoverable error in my environment, Amazon MWAA will automatically roll back to the previous working version.


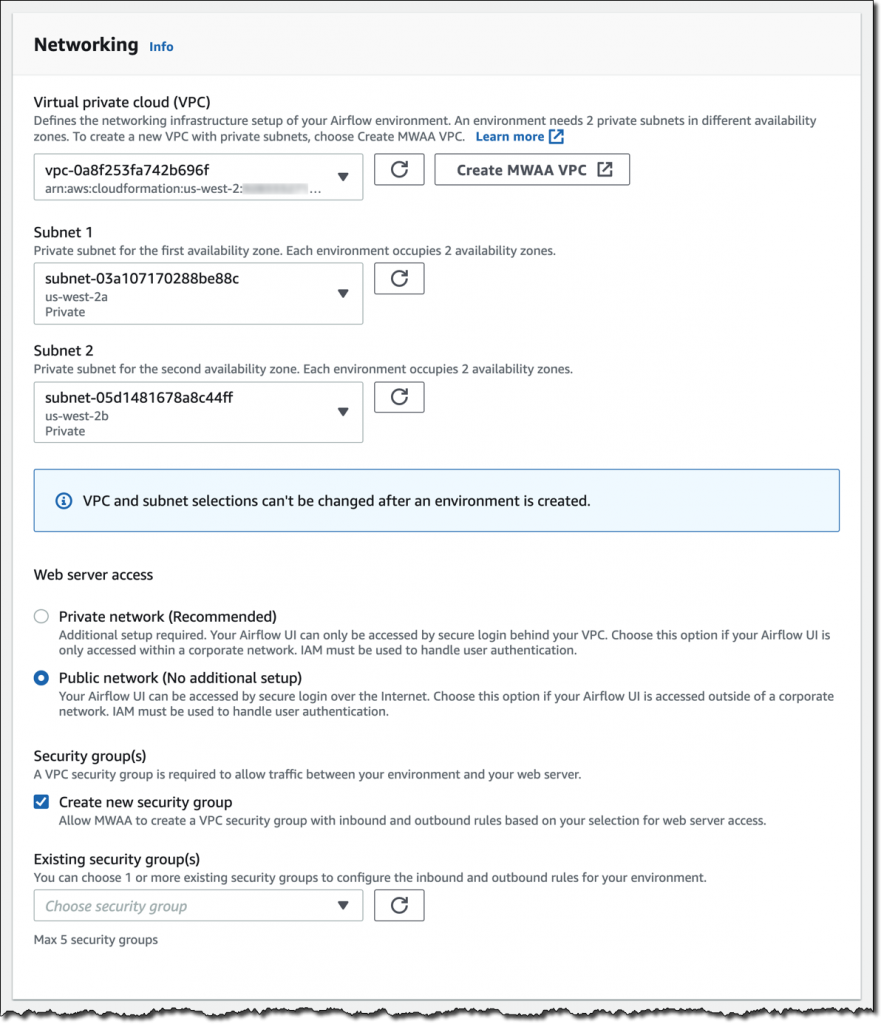
I click Next to configure the advanced settings, starting with networking. Each environment runs in a Amazon Virtual Private Cloud using private subnets in two availability zones. Web server access to the Airflow UI is always protected by a secure login using AWS Identity and Access Management (IAM). However, you can choose to have web server access on a public network so that you can login over the Internet, or on a private network in your VPC. For simplicity, I select a Public network. I let Amazon MWAA create a new security group with the correct inbound and outbound rules. Optionally, I can add one or more existing security groups to fine-tune control of inbound and outbound traffic for your environment.

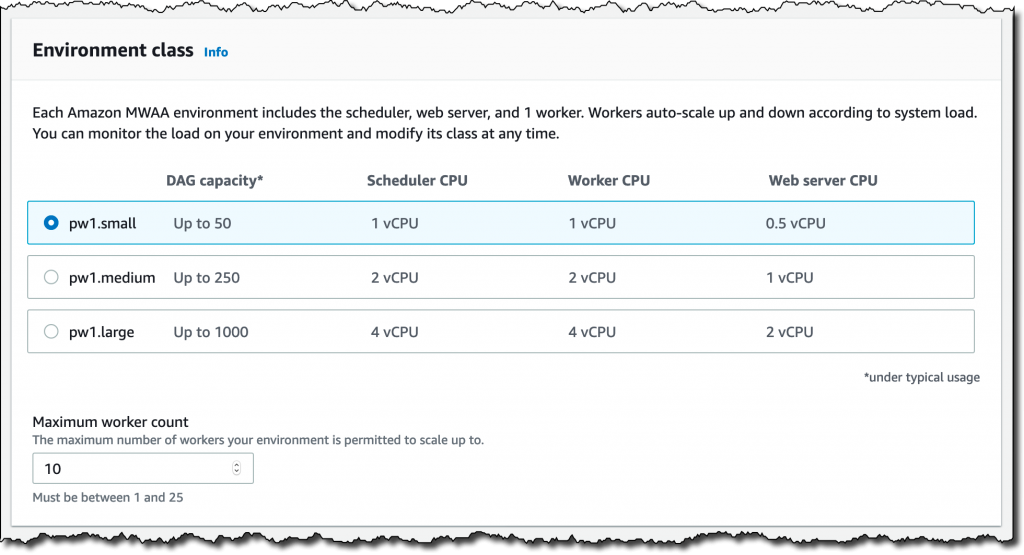
Now, I configure my environment class. Each environment includes a scheduler, a web server, and a worker. Workers automatically scale up and down according to my workload. We provide you a suggestion on which class to use based on the number of DAGs, but you can monitor the load on your environment and modify its class at any time.

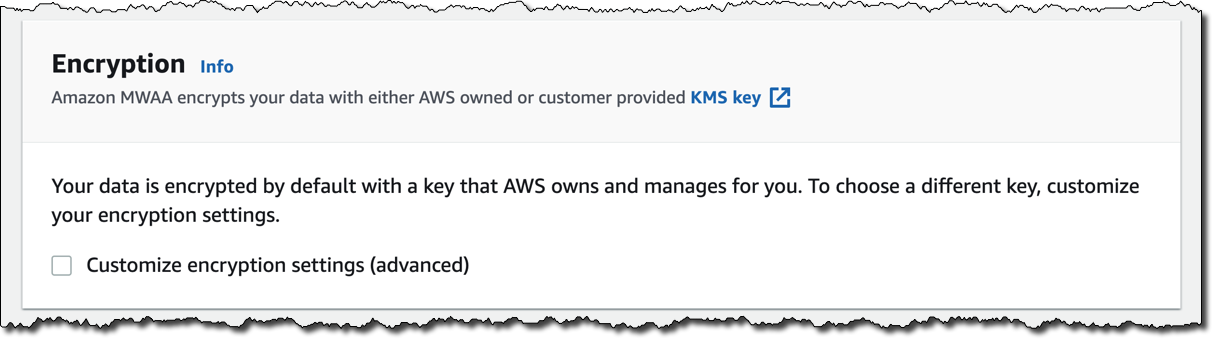
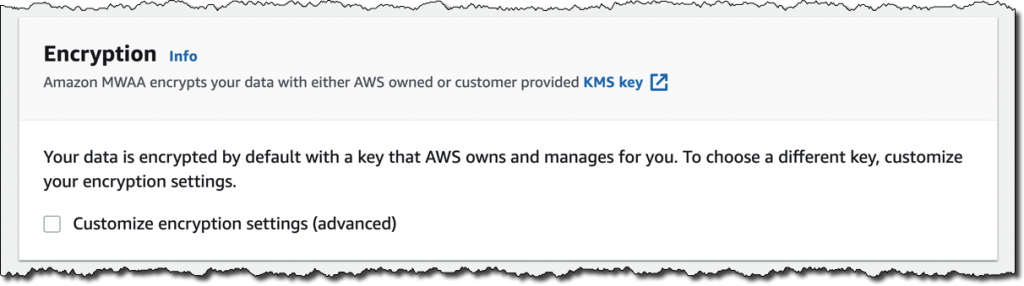
Encryption is always enabled for data at rest, and while I can select a customized key managed by AWS Key Management Service (KMS) I will instead keep the default key that AWS owns and manages on my behalf.

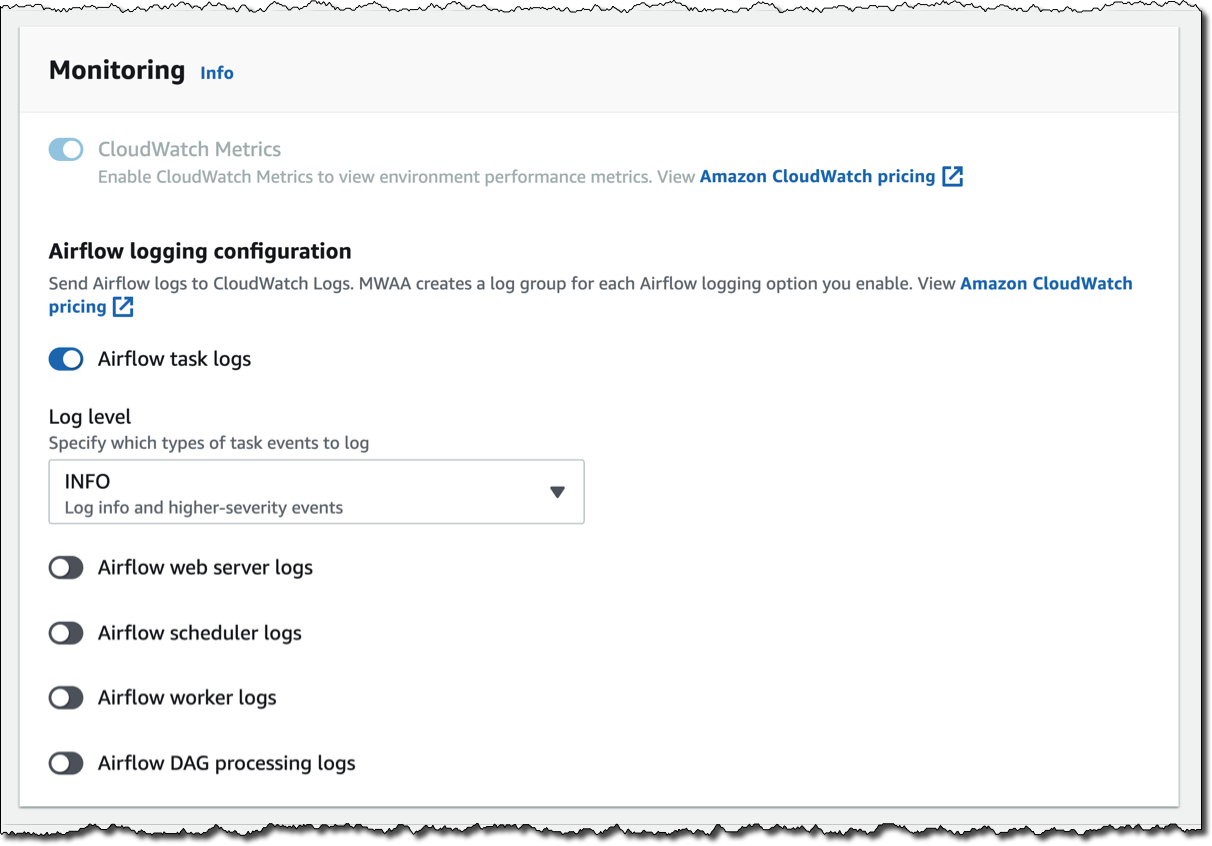
For monitoring, I publish environment performance to CloudWatch Metrics. This is enabled by default, but I can disable CloudWatch Metrics after launch. For the logs, I can specify the log level and which Airflow components should send their logs to CloudWatch Logs. I leave the default to send only the task logs and use log level INFO.

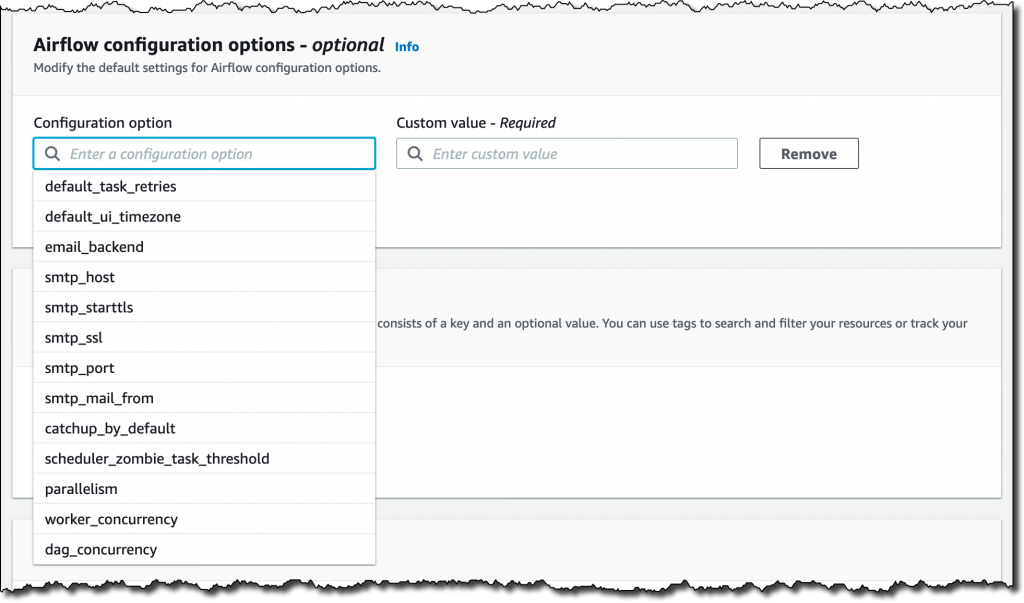
I can modify the default settings for Airflow configuration options, such as default_task_retries or worker_concurrency. For now, I am not changing these values.

Finally, but most importantly, I configure the permissions that will be used by my environment to access my DAGs, write logs, and run DAGs accessing other AWS resources. I select Create a new role and click on Create environment. After a few minutes, the new Airflow environment is ready to be used.

Using the Airflow UI
In the Amazon MWAA console, I look for the new environment I just created and click on Open Airflow UI. A new browser window is created and I am authenticated with a secure login via AWS IAM.

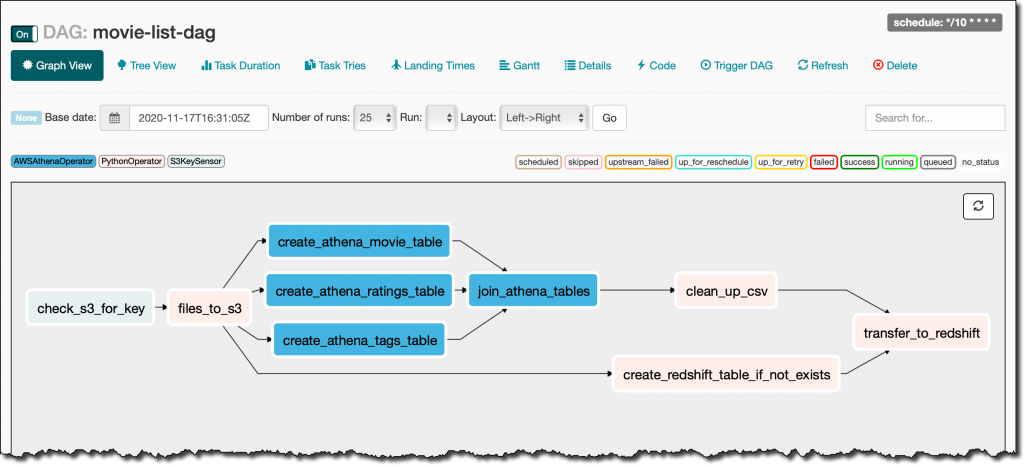
There, I look for a DAG that I put on S3 in the movie_list_dag.py file. The DAG is downloading the MovieLens dataset, processing the files on S3 using Amazon Athena, and loading the result to a Redshift cluster, creating the table if missing.

Here’s the full source code of the DAG:

from airflow import DAG
from airflow.operators.python_operator import PythonOperator
from airflow.operators import HttpSensor, S3KeySensor
from airflow.contrib.operators.aws_athena_operator import AWSAthenaOperator
from airflow.utils.dates import days_ago
from datetime import datetime, timedelta
from io import StringIO
from io import BytesIO
from time import sleep
import csv
import requests
import json
import boto3
import zipfile
import io
s3_bucket_name = 'my-bucket'
s3_key='files/'
redshift_cluster='redshift-cluster-1'
redshift_db='dev'
redshift_dbuser='awsuser'
redshift_table_name='movie_demo'
test_http='https://grouplens.org/datasets/movielens/latest/'
download_http='http://files.grouplens.org/datasets/movielens/ml-latest-small.zip'
athena_db='demo_athena_db'
athena_results='athena-results/'
create_athena_movie_table_query="""
CREATE EXTERNAL TABLE IF NOT EXISTS Demo_Athena_DB.ML_Latest_Small_Movies (
  `movieId` int,
  `title` string,
  `genres` string 
)
ROW FORMAT SERDE 'org.apache.hadoop.hive.serde2.lazy.LazySimpleSerDe'
WITH SERDEPROPERTIES (
  'serialization.format' = ',',
  'field.delim' = ','
) LOCATION 's3://pinwheeldemo1-pinwheeldagsbucketfeed0594-1bks69fq0utz/files/ml-latest-small/movies.csv/ml-latest-small/'
TBLPROPERTIES (
  'has_encrypted_data'='false',
  'skip.header.line.count'='1'
); 
"""
create_athena_ratings_table_query="""
CREATE EXTERNAL TABLE IF NOT EXISTS Demo_Athena_DB.ML_Latest_Small_Ratings (
  `userId` int,
  `movieId` int,
  `rating` int,
  `timestamp` bigint 
)
ROW FORMAT SERDE 'org.apache.hadoop.hive.serde2.lazy.LazySimpleSerDe'
WITH SERDEPROPERTIES (
  'serialization.format' = ',',
  'field.delim' = ','
) LOCATION 's3://pinwheeldemo1-pinwheeldagsbucketfeed0594-1bks69fq0utz/files/ml-latest-small/ratings.csv/ml-latest-small/'
TBLPROPERTIES (
  'has_encrypted_data'='false',
  'skip.header.line.count'='1'
); 
"""
create_athena_tags_table_query="""
CREATE EXTERNAL TABLE IF NOT EXISTS Demo_Athena_DB.ML_Latest_Small_Tags (
  `userId` int,
  `movieId` int,
  `tag` int,
  `timestamp` bigint 
)
ROW FORMAT SERDE 'org.apache.hadoop.hive.serde2.lazy.LazySimpleSerDe'
WITH SERDEPROPERTIES (
  'serialization.format' = ',',
  'field.delim' = ','
) LOCATION 's3://pinwheeldemo1-pinwheeldagsbucketfeed0594-1bks69fq0utz/files/ml-latest-small/tags.csv/ml-latest-small/'
TBLPROPERTIES (
  'has_encrypted_data'='false',
  'skip.header.line.count'='1'
); 
"""
join_tables_athena_query="""
SELECT REPLACE ( m.title , '"' , '' ) as title, r.rating
FROM demo_athena_db.ML_Latest_Small_Movies m
INNER JOIN (SELECT rating, movieId FROM demo_athena_db.ML_Latest_Small_Ratings WHERE rating > 4) r on m.movieId = r.movieId
"""
def download_zip():
    s3c = boto3.client('s3')
    indata = requests.get(download_http)
    n=0
    with zipfile.ZipFile(io.BytesIO(indata.content)) as z:       
        zList=z.namelist()
        print(zList)
        for i in zList: 
            print(i) 
            zfiledata = BytesIO(z.read(i))
            n += 1
            s3c.put_object(Bucket=s3_bucket_name, Key=s3_key+i+'/'+i, Body=zfiledata)
def clean_up_csv_fn(**kwargs):    
    ti = kwargs['task_instance']
    queryId = ti.xcom_pull(key='return_value', task_ids='join_athena_tables' )
    print(queryId)
    athenaKey=athena_results+"join_athena_tables/"+queryId+".csv"
    print(athenaKey)
    cleanKey=athena_results+"join_athena_tables/"+queryId+"_clean.csv"
    s3c = boto3.client('s3')
    obj = s3c.get_object(Bucket=s3_bucket_name, Key=athenaKey)
    infileStr=obj['Body'].read().decode('utf-8')
    outfileStr=infileStr.replace('"e"', '') 
    outfile = StringIO(outfileStr)
    s3c.put_object(Bucket=s3_bucket_name, Key=cleanKey, Body=outfile.getvalue())
def s3_to_redshift(**kwargs):    
    ti = kwargs['task_instance']
    queryId = ti.xcom_pull(key='return_value', task_ids='join_athena_tables' )
    print(queryId)
    athenaKey='s3://'+s3_bucket_name+"/"+athena_results+"join_athena_tables/"+queryId+"_clean.csv"
    print(athenaKey)
    sqlQuery="copy "+redshift_table_name+" from '"+athenaKey+"' iam_role 'arn:aws:iam::163919838948:role/myRedshiftRole' CSV IGNOREHEADER 1;"
    print(sqlQuery)
    rsd = boto3.client('redshift-data')
    resp = rsd.execute_statement(
        ClusterIdentifier=redshift_cluster,
        Database=redshift_db,
        DbUser=redshift_dbuser,
        Sql=sqlQuery
    )
    print(resp)
    return "OK"
def create_redshift_table():
    rsd = boto3.client('redshift-data')
    resp = rsd.execute_statement(
        ClusterIdentifier=redshift_cluster,
        Database=redshift_db,
        DbUser=redshift_dbuser,
        Sql="CREATE TABLE IF NOT EXISTS "+redshift_table_name+" (title   character varying, rating       int);"
    )
    print(resp)
    return "OK"
DEFAULT_ARGS = {
    'owner': 'airflow',
    'depends_on_past': False,
    'email': ['airflow@example.com'],
    'email_on_failure': False,
    'email_on_retry': False 
}
with DAG(
    dag_id='movie-list-dag',
    default_args=DEFAULT_ARGS,
    dagrun_timeout=timedelta(hours=2),
    start_date=days_ago(2),
    schedule_interval='*/10 * * * *',
    tags=['athena','redshift'],
) as dag:
    check_s3_for_key = S3KeySensor(
        task_id='check_s3_for_key',
        bucket_key=s3_key,
        wildcard_match=True,
        bucket_name=s3_bucket_name,
        s3_conn_id='aws_default',
        timeout=20,
        poke_interval=5,
        dag=dag
    )
    files_to_s3 = PythonOperator(
        task_id="files_to_s3",
        python_callable=download_zip
    )
    create_athena_movie_table = AWSAthenaOperator(task_id="create_athena_movie_table",query=create_athena_movie_table_query, database=athena_db, output_location='s3://'+s3_bucket_name+"/"+athena_results+'create_athena_movie_table')
    create_athena_ratings_table = AWSAthenaOperator(task_id="create_athena_ratings_table",query=create_athena_ratings_table_query, database=athena_db, output_location='s3://'+s3_bucket_name+"/"+athena_results+'create_athena_ratings_table')
    create_athena_tags_table = AWSAthenaOperator(task_id="create_athena_tags_table",query=create_athena_tags_table_query, database=athena_db, output_location='s3://'+s3_bucket_name+"/"+athena_results+'create_athena_tags_table')
    join_athena_tables = AWSAthenaOperator(task_id="join_athena_tables",query=join_tables_athena_query, database=athena_db, output_location='s3://'+s3_bucket_name+"/"+athena_results+'join_athena_tables')
    create_redshift_table_if_not_exists = PythonOperator(
        task_id="create_redshift_table_if_not_exists",
        python_callable=create_redshift_table
    )
    clean_up_csv = PythonOperator(
        task_id="clean_up_csv",
        python_callable=clean_up_csv_fn,
        provide_context=True     
    )
    transfer_to_redshift = PythonOperator(
        task_id="transfer_to_redshift",
        python_callable=s3_to_redshift,
        provide_context=True     
    )
    check_s3_for_key >> files_to_s3 >> create_athena_movie_table >> join_athena_tables >> clean_up_csv >> transfer_to_redshift
    files_to_s3 >> create_athena_ratings_table >> join_athena_tables
    files_to_s3 >> create_athena_tags_table >> join_athena_tables
    files_to_s3 >> create_redshift_table_if_not_exists >> transfer_to_redshift

In the code, different tasks are created using operators like PythonOperator, for generic Python code, or AWSAthenaOperator, to use the integration with Amazon Athena. To see how those tasks are connected in the workflow, you can see the latest few lines, that I repeat here (without indentation) for simplicity:

check_s3_for_key >> files_to_s3 >> create_athena_movie_table >> join_athena_tables >> clean_up_csv >> transfer_to_redshift
files_to_s3 >> create_athena_ratings_table >> join_athena_tables
files_to_s3 >> create_athena_tags_table >> join_athena_tables
files_to_s3 >> create_redshift_table_if_not_exists >> transfer_to_redshift

The Airflow code is overloading the right shift >> operator in Python to create a dependency, meaning that the task on the left should be executed first, and the output passed to the task on the right. Looking at the code, this is quite easy to read. Each of the four lines above is adding dependencies, and they are all evaluated together to execute the tasks in the right order.

In the Airflow console, I can see a graph view of the DAG to have a clear representation of how tasks are executed:

Available Now
Amazon Managed Workflows for Apache Airflow (MWAA) is available today in US East (Northern Virginia), US West (Oregon), US East (Ohio), Asia Pacific (Singapore), Asia Pacific (Toyko), Asia Pacific (Sydney), Europe (Ireland), Europe (Frankfurt), and Europe (Stockholm). You can launch a new Amazon MWAA environment from the console, AWS Command Line Interface (CLI), or AWS SDKs. Then, you can develop workflows in Python using Airflow’s ecosystem of integrations.

With Amazon MWAA, you pay based on the environment class and the workers you use. For more information, see the pricing page.

Upstream compatibility is a core tenet of Amazon MWAA. Our code changes to the AirFlow platform are released back to open source.

With Amazon MWAA you can spend more time building workflows for your engineering and data science tasks, and less time managing and scaling the infrastructure of your Airflow platform.

Learn more about Amazon MWAA and get started today!

Danilo

Via AWS News Blog https://ift.tt/1EusYcK

On-premises data warehouses are dead

Global Market Insights estimates that cloud providers will host the majority of data warehousing loads by 2025. But don’t take their word for it. Gartner estimates that 30 percent of data warehousing workloads now run in the cloud and that this will grow to two-thirds by 2024. Just a few years ago in 2016 the figure was less than 7 percent, also according to Gartner.   

None of this should be a surprise. Even the core data warehouse technology providers have seen this trend and are spending the majority of their R&D budgets to build solutions for public cloud providers. Moreover, the public cloud providers themselves have “company killing” products, such as AWS’s RedShift, a columnar database designed to compete with the larger enterprise data warehouse players. 

To read this article in full, please click here

Monday, November 23, 2020

New – Code Signing, a Trust and Integrity Control for AWS Lambda

Code signing is an industry standard technique used to confirm that the code is unaltered and from a trusted publisher. Code running inside AWS Lambda functions is executed on highly hardened systems and runs in a secure manner. However, function code is susceptible to alteration as it moves through deployment pipelines that run outside AWS.

Today, we are launching Code Signing for AWS Lambda. It is a trust and integrity control that helps administrators enforce that only signed code packages from trusted publishers run in their Lambda functions and that the code has not been altered since signing.

Code Signing for Lambda provides a first-class mechanism to enforce that only trusted code is deployed in Lambda. This frees up organizations from the burden of building gatekeeper components in their deployment pipelines. Code Signing for AWS Lambda leverages AWS Signer, a fully managed code signing service from AWS. Administrators create Signing Profile, a resource in AWS Signer that is used for creating signatures and grant developers access to the signing profile using AWS Identity and Access Management (IAM). Within Lambda, administrators specify the allowed signing profiles using a new resource called Code Signing Configuration (CSC). CSC enables organizations to implement a separation of duties between administrators and developers. Administrators can use CSC to set code signing policies on the functions, and developers can deploy code to the functions.

How to Create a Signing Profile
You can use AWS Signer console to create a new Signing profile. A signing profile can represent a group of trusted publishers and is analogous to the use of a digital signing certificate.

By clicking Create Signing Profile, you can create a Signing Profile that can be used to create signed code packages.

You can assign Signature validity period for the signatures generated by a Signing Profile between 1 day and 135 months.

How to create a Code Signing Configuration (CSC)
You can configure your functions to use Code Signing through the AWS Lambda console, Command-line Interface (CLI), or APIs by creating and attaching a new resource called Code Signing Configuration to the function. You can find Code signing configurations under Additional resources menu.

You can click Create configuration to define signing profiles that are allowed to sign code artifacts for this configuration, and set signature validation policy. To add an allowed signing profile, you can either select from the dropdown, which shows all signing profiles in your AWS account, or add a signing profile from a different account by specifying the version ARN.

Also, you can set the signature validation policy to either ‘Warn’ or ‘Enforce’. With ‘Warn’, Lambda logs a Cloudwatch metric if there is a signature check failure but accepts the deployment. With ‘Enforce’, Lambda rejects the deployment if there is a signature check failure. Signature check fails if the signature signing profile does not match one of the allowed signing profiles in the CSC, the signature is expired, or the signature is revoked. If the code package is tampered or altered since signing, the deployment is always rejected, irrespective of the signature validation policy.

You can use new Lambda API CreateCodeSigningConfig to create a CSC too. You can see the JSON request syntax below.

{
     "CodeSigningConfigId": string,
     "CodeSigningConfigArn": string,
     "Description": string,
     "AllowedPublishers": {
           "SigningProfileVersionArns": [string]
      },
     "CodeSigningPolicies": {
     "UntrustedArtifactOnDeployment": string,   // WARN OR ENFORCE
    },
     "LastModified”: string
}

Let’s Enable Code Signing for Your Lambda Functions
To enable Code Signing feature for your Lambda functions, you can select a function and click Edit in Code signing configuration section.

Select one of the available CSCs and click the Save button.

Once your function is configured to use code signing, you need to upload signed .zip file or Amazon S3 URL of a signed .zip made by a signing job in AWS Signer.

How to Create a Signed Code Package
Choose one of the allowed signing profiles and specify the S3 location of the code package ZIP file to be signed. Also, specify a destination path where the signed code package should be uploaded.

A signing job is an asynchronous process that generates a signature for your code package and puts the signed code package in the specified destination path.

Once signing job is succeeded, you can find signed ZIP packages in your assigned S3 bucket.

Back to Lambda console, you can now publish the signed code package to the Lambda function. Lambda will perform signature checks to verify that the code has not been altered since signing and that the code is signed by one of the allowed signing profile.

You can also enable code signing for a function using CreateFunction or PutFunctionCodeSigningConfig APIs by attaching a CSC to the function.

Developers can also use SAM CLI to sign code packages. They do this by specifying the signing profiles at package or deploy stage. SAM CLI automatically starts the signing workflow before deploying the code to Lambda.

Code Signing is also supported by Infrastructure as code tools like AWS CloudFormation and Terraform. Terraform also allows developers to sign code, in addition to declaring and creating code signing resources.

Now Available
Code Signing for AWS Lambda is available in all commercial regions except AWS China Regions, AWS GovCloud (US) Regions, and Asia Pacific (Osaka) Region. There is no additional charge for using code signing, and customers pay the standard price for Lambda functions.

To learn more about Code Signing for AWS Lambda and AWS Signer, please visit the Lambda developer guide and send us feedback either in the forum for AWS Lambda or through your usual AWS support contacts.

Channy;

Via AWS News Blog https://ift.tt/1EusYcK

New – Multi-Factor Authentication with WebAuthn for AWS SSO

Starting today, you can add WebAuthn as a new multi-factor authentication (MFA) to AWS Single Sign-On, in addition to currently supported one-time password (OTP) and Radius authenticators. By adding support for WebAuthn, a W3C specification developed in coordination with FIDO Alliance, you can now authenticate with a wide variety of interoperable authenticators provisioned by your system administrator or built into your laptops or smartphones. For example, you can now tap a hardware security key, touch a fingerprint sensor on your Mac, or use facial recognition on your mobile device or PC to authenticate into the AWS Management Console or AWS Command Line Interface (CLI).

With this addition, you can now self-register multiple MFA authenticators. Doing so allows you to authenticate on AWS with another device in case you lose or misplace your primary authenticator device. We make it easy for you to name your devices for long-term manageability.

WebAuthn two-factor authentication is available for identities stored in the AWS Single Sign-On internal identity store and those stored in Microsoft Active Directory, whether it is managed by AWS or not.

What are WebAuthn and FIDO2?

Before exploring how to configure two-factor authentication using your FIDO2-enabled devices, and to discover the user experience for web-based and CLI authentications, let’s recap how FIDO2, WebAuthn and other specifications fit together.

FIDO2 is made of two core specifications: Web Authentication (WebAuthn) and Client To Authenticator Protocol (CTAP).

Web Authentication (WebAuthn) is a W3C standard that provides strong authentication based upon public key cryptography. Unlike traditional code generator tokens or apps using TOTP protocol, it does not require sharing a secret between the server and the client. Instead, it relies on a public key pair and digital signature of unique challenges. The private key never leaves a secured device, the FIDO-enabled authenticator. When you try to authenticate to a website, this secured device interacts with your browser using the CTAP protocol.

WebAuthn is strong: Authentication is ideally backed by a secure element, which can safely store private keys and perform the cryptographic operations. It is scoped: A key pair is only useful for a specific origin, like browser cookies. A key pair registered at console.amazonaws.com cannot be used at console.not-the-real-amazon.com, mitigating the threat of phishing. Finally, it is attested: Authenticators can provide a certificate that helps servers verify that the public key did in fact come from an authenticator they trust, and not a fraudulent source.

To start to use FIDO2 authentication, you therefore need three elements: a website that supports WebAuthn, a browser that supports WebAuthn and CTAP protocols, and a FIDO authenticator. Starting today, the SSO Management Console and CLI now support WebAuthn. All modern web browsers are compatible (Chrome, Edge, Firefox, and Safari). FIDO authenticators are either devices you can use from one device or another (roaming authenticators), such as a YubiKey, or built-in hardware supported by Android, iOS, iPadOS, Windows, Chrome OS, and macOS (platform authenticators).

How Does FIDO2 Work?
When I first register my FIDO-enabled authenticator on AWS SSO, the authenticator creates a new set of public key credentials that can be used to sign a challenge generated by AWS SSO Console (the relaying party). The public part of these new credentials, along with the signed challenge, are stored by AWS SSO.

When I want to use WebAuthn as second factor authentication, the AWS SSO console sends a challenge to my authenticator. This challenge can then be signed with the previously generated public key credentials and sent back to the console. This way, AWS SSO console can verify that I have the required credentials.

How Do I Enable MFA With a Secure Device in the AWS SSO Console?
You, the system administrator, can enable MFA for your AWS SSO workforce when the user profiles are stored in AWS SSO itself, or stored in your Active Directory, either self-managed or a AWS Directory Service for Microsoft Active Directory.

To let my workforce register their FIDO or U2F authenticator in self-service mode, I first navigate to Settings, click Configure under Multi-Factor Authentication. On the following screen, I make four changes. First, under Users should be prompted for MFA, I select Every time they sign in. Second, under Users can authenticate with these MFA types, I check Security Keys and built-in authenticators. Third, under If a user does not yet have a registered MFA device, I check Require them to register an MFA device at sign in. Finally, under Who can manage MFA devices, I check Users can add and manage their own MFA devices. I click on Save Changes to save and return.

Configure SSO 2

That’s it. Now your workforce is prompted to register their MFA device the next time they authenticate.

What Is the User Experience?
As an AWS console user, I authenticate on the AWS SSO portal page URL that I received from my System Administrator. I sign in using my user name and password, as usual. On the next screen, I am prompted to register my authenticator. I check Security Key as device type. To use a biometric factor such as fingerprints or face recognition, I would click Built-in authenticator.

Register MFA Device

The browser asks me to generate a key pair and to send my public key. I can do that just by touching a button on my device, or providing the registered biometric, e.g. TouchID or FaceID.Register a security keyThe browser does confirm and shows me a last screen where I have the possibility to give a friendly name to my device, so I can remember which one is which. Then I click Save and Done.Confirm device registrationFrom now on, every time I sign in, I am prompted to touch my security device or use biometric authentication on my smartphone or laptop. What happens behind the scene is the server sending a challenge to my browser. The browser sends the challenge to the security device. The security device uses my private key to sign the challenge and to return it to the server for verification. When the server validates the signature with my public key, I am granted access to the AWS Management Console.

Additional verification required

At any time, I can register additional devices and manage my registered devices. On the AWS SSO portal page, I click MFA devices on the top-right part of the screen.

MFA device management

I can see and manage the devices registered for my account, if any. I click Register device to register a new device.

How to Configure SSO for the AWS CLI?
Once my devices are configured, I can configure SSO on the AWS Command Line Interface (CLI).

I first configure CLI SSO with aws configure sso and I enter the SSO domain URL that I received from my system administrator. The CLI opens a browser where I can authenticate with my user name, password, and my second-factor authentication configured previously. The web console gives me a code that I enter back into the CLI prompt.aws configure sso

When I have access to multiple AWS Accounts, the CLI lists them and I choose the one I want to use. This is a one-time configuration.

Once this is done, I can use the aws CLI as usual, the SSO authentication happens automatically behind the scene. You are asked to re-authenticate from time to time, depending on the configuration set by your system administrator.

Available today
Just like AWS Single Sign-On, FIDO2 second-factor authentication is provided to you at no additional cost, and is available in all AWS Regions where AWS SSO is available.

As usual, we welcome your feedback. The team told me they are working on other features to offer you additional authentication options in the near future.

You can start to use FIDO2 as second factor authentication for AWS Single Sign-On today. Configure it now.

-- seb Via AWS News Blog https://ift.tt/1EusYcK

Friday, November 20, 2020

Weaponizing the cloud to fight addiction

According to the CDC, opioids were involved in 46,802 overdose deaths in 2018 (69.5 percent of all drug overdose deaths). For those of you living in the United States, this is old news.

As the pandemic stretches on, deaths in the U.S. from opioids and other habit-forming drugs such as alcohol, are likely to rise in 2020. We’re at a point where most health organizations are deeply concerned.

We could reduce the number of deaths by helping addicts in better ways. The combinations of cloud, artificial intelligence, and IoT (Internet of Things) working together could replace rehab clinics as the preferred way to overcome dangerous or unhealthy addictions.

To read this article in full, please click here

Thursday, November 19, 2020

Multi-Region Replication Now Enabled for AWS Managed Microsoft Active Directory

Our customers build applications that need to serve users that live in all corners of the world. When listening to our customers, they told us that whilst they were comfortable building Active Directory (AD) aware applications on AWS, making them work globally can be a real challenge.

Customers told us that AWS Directory Service for Microsoft Active Directory had saved them time and money and provided them with all the capabilities they need to run their AD-aware applications. However, if they wanted to go global, they needed to create independent AWS Managed Microsoft AD directories per Region. They would then need to create a solution to synchronize data across each Region. This level of management overhead is significant, complex, and costly. It also slowed customers as they sought to migrate their AD-aware workloads to the cloud.

Today, I want to tell you about a new feature that allows customers to deploy a single AWS Managed Microsoft AD across multiple AWS Regions. This new feature called multi-region replication automatically configures inter-region networking connectivity, deploys domain controllers, and replicates all the Active Directory data across multiple Regions, ensuring that Windows and Linux workloads residing in those Regions can connect to and use AWS Managed Microsoft AD with low latency and high performance. AWS Managed Microsoft AD makes it more cost-effective for customers to migrate AD-aware applications and workloads to AWS and easier to operate them globally. In addition, automated multi-region replication provides multi-region resiliency.

AWS can now synchronize all customer directory data, including users, groups, Group Policy Objects (GPOs), and schema across multiple Regions. AWS handles automated software updates, monitoring, recovery, and the security of the underlying AD infrastructure across all Regions, enabling customers to focus on building their applications. Integrating with Amazon CloudWatch Logs and Amazon Simple Notification Service (SNS), AWS Managed Microsoft AD makes it easy for customers to monitor the directory’s health, and security logs globally.

How It Works 
Let me show you how to create an Active Directory that spans multiple Regions using the AWS Managed Microsoft AD console. You do not have to create a new directory to use multi-region replication it will work on all your existing directories too.

First, I create a new Directory following the normal steps. I select Enterprise Edition since this is the only edition that supports multi-region replication.

I give my Directory a name and a description and then set an Admin password. I then click Next which takes me to the Networking setup.

I select a Amazon Virtual Private Cloud that I use for demos and then choose two subnets which are in separate Availability Zones. The AWS Managed Microsoft AD deploys two domain controllers per region and places them in separate subnets which are in different Availability Zones, this is done for resiliency reasons so that the directory can still operate even if one of the Availability Zones has issues.

Once I click next, I am presented with the review screen and I click Create Directory.

The directory takes between 20-45 minutes to be created. There is now a column on the Directories listing page that says Multi-Region, this directory has this value currently set to No indicating that it does not span multiple Regions

Once the directory has been created, I click on the Directory ID and drill into the details. I now have a new section called Multi-Region replication and there is a button called Add Region. If I click this button I can then configure an additional Region.

I select the Region that I want to add to my directory, in this example US West (Oregon) us-west-2, I then select a VPC in that Region and two subnets that must reside in separate Availability Zones. Finally, I click the Add button to add this new Region for my directory.

Now back on the directory details page I see there are two Regions listed one in US East (N. Virginia) and one in US West (Oregon), again the creation process can take upto 45 minutes, but once it has complete I will have my directory replicated across two Regions.

Costs
You pay by the hour for the domain controllers in each region, plus the cross-region data transfer. It’s important to understand that this feature will create two domain controllers in each Region that you Add, and so applications that reside in these Regions can now communicate with a local directory which lowers costs by minimizing the need for data transfer. To learn more, visit the pricing page.

Available Now
This new feature can be used today and is available for both new and existing directories that use the Enterprise Edition in any of the following Regions: US East (N. Virginia), US East (Ohio), US West (N. California), US West (Oregon), AWS GovCloud (US-East), US West (Oregon), Asia Pacific (Mumbai), Asia Pacific (Seoul), Asia Pacific (Singapore), Asia Pacific (Sydney), Asia Pacific (Tokyo), Canada (Central), Europe (Frankfurt), Europe (Ireland), Europe (London), Europe (Paris), Europe (Stockholm), and South America (São Paulo).

Head over to the product page to learn more, view pricing, and get started creating directories that span multiple AWS Regions.

Happy Administering

— Martin Via AWS News Blog https://ift.tt/1EusYcK