Friday, August 28, 2020

How to find cloud talent during a boom

We made the call from the start: COVID-19 would spike the need for cloud computing and cloud computing talent. IDC’s latest Worldwide Quarterly Cloud IT Infrastructure Tracker noted an increase in cloud spending with traditional infrastructure taking a dirt nap. The pandemic was the primary driver behind the shift in IT spending, with IDC noting that widespread remote work triggered demand for enterprise cloud-based services.

Of course, that was last quarter. The outlook for the remainder of the year is explosive cloud growth with funding and acceleration of cloud projects underway right now or about to begin. What currently hinders an enterprise’s movement to the cloud is the lack of cloud talent, including architects, security specialists, developers, operations, and secops engineers, to name just a few. 

To read this article in full, please click here

Thursday, August 27, 2020

Announcing a second Local Zone in Los Angeles

In December 2019, Jeff Barr published this post announcing the launch of a new Local Zone in Los Angeles, California. A Local Zone extends existing AWS regions closer to end-users, providing single-digit millisecond latency to a subset of AWS services in the zone. Local Zones are attached to parent regions – in this case US West (Oregon) – and access to services and resources is performed through the parent region’s endpoints. This makes Local Zones transparent to your applications and end-users. Applications running in a Local Zone have access to all AWS services, not just the subset in the zone, via Amazon’s redundant and very high bandwidth private network backbone to the parent region.

At the end of the post, Jeff wrote (and I quote) – “In the fullness of time (as Andy Jassy often says), there could very well be more than one Local Zone in any given geographic area. In 2020, we will open a second one in Los Angeles (us-west-2-lax-1b), and are giving consideration to other locations.”

Well – that time has come! I’m pleased to announce that following customer requests, AWS today launched a second Local Zone in Los Angeles to further help customers in the area (and Southern California generally) to achieve even greater high-availability and fault tolerance for their applications, in conjunction with very low latency. These customers have workloads that require very low latency, such as artist workstations, local rendering, gaming, financial transaction processing, and more.

The new Los Angeles Local Zone contains a subset of services, such as Amazon Elastic Compute Cloud (EC2), Amazon Elastic Block Store (EBS), Amazon FSx for Windows File Server and Amazon FSx for Lustre, Elastic Load Balancing, Amazon Relational Database Service (RDS), and Amazon Virtual Private Cloud, and remember, applications running in the zone can access all AWS services and other resources through the zone’s association with the parent region.

Enabling Local Zones
Once you opt-in to use one or more Local Zones in your account, they appear as additional Availability Zones for you to use when deploying your applications and resources. The original zone, launched last December, was us-west-2-lax-1a. The additional zone, available to all customers now, is us-west-2-lax-1b. Local Zones can be enabled using the new Settings section of the EC2 Management Console, as shown below

As noted in Jeff’s original post, you can also opt-in (or out) of access to Local Zones with the AWS Command Line Interface (CLI) (aws ec2 modify-availability-zone-group command), AWS Tools for PowerShell (Edit-EC2AvailabilityZoneGroup cmdlet), or by calling the ModifyAvailabilityZoneGroup API from one of the AWS SDKs.

Using Local Zones for Highly-Available, Low-Latency Applications
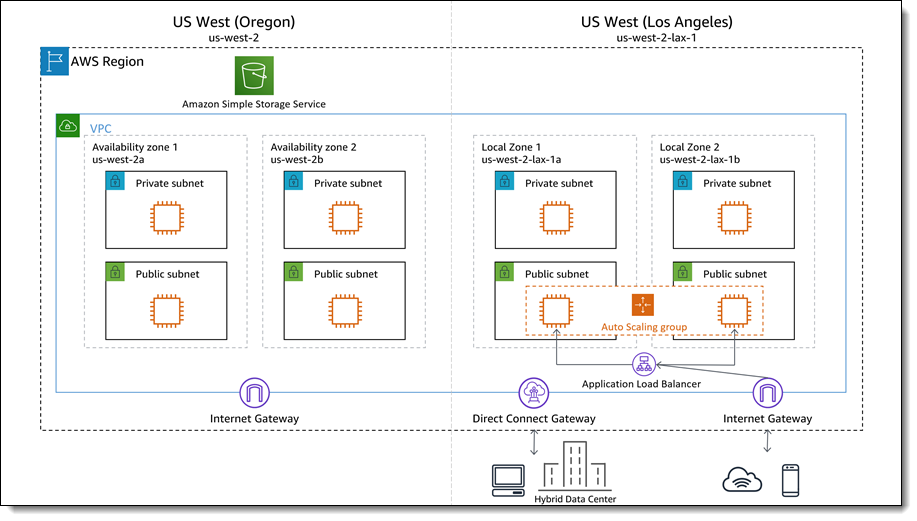
Local Zones can be used to further improve high availability for applications, as well as ultra-low latency. One scenario is for enterprise migrations using a hybrid architecture. These enterprises have workloads that currently run in existing on-premises data centers in the Los Angeles metro area and it can be daunting to migrate these application portfolios, many of them interdependent, to the cloud. By utilizing AWS Direct Connect in conjunction with a Local Zone, these customers can establish a hybrid environment that provides ultra-low latency communication between applications running in the Los Angeles Local Zone and the on-premises installations without needing a potentially expensive revamp of their architecture. As time progresses, the on-premises applications can be migrated to the cloud in an incremental fashion, simplifying the overall migration process. The diagram below illustrates this type of enterprise hybrid architecture.

Anecdotally, we have heard from customers using this type of hybrid architecture, combining Local Zones with AWS Direct Connect, that they are achieving sub-1.5ms latency communication between the applications hosted in the Local Zone and those in the on-premises data center in the LA metro area.

Virtual desktops for rendering and animation workloads is another scenario for Local Zones. For these workloads, latency is critical and the addition of a second Local Zone for Los Angeles gives additional failover capability, without sacrificing latency, should the need arise.

As always, the teams are listening to your feedback – thank you! – and are working on adding Local Zones in other locations, along with the availability of additional services, including Amazon ECS Amazon Elastic Kubernetes Service, Amazon ElastiCache, Amazon Elasticsearch Service, and Amazon Managed Streaming for Apache Kafka. If you’re an AWS customer based in Los Angeles or Southern California, with a requirement for even greater high-availability and very low latency for your workloads, then we invite you to check out the new Local Zone. More details and pricing information can be found at Local Zone.

— Steve Via AWS News Blog https://ift.tt/1EusYcK

Seamlessly Join a Linux Instance to AWS Directory Service for Microsoft Active Directory

Many customers I speak to use Active Directory to manage centralized user authentication and authorization for a variety of applications and services. For these customers, Active Directory is a critical piece of their IT Jigsaws.

At AWS, we offer the AWS Directory Service for Microsoft Active Directory that provides our customers with a highly available and resilient Active Directory service that is built on actual Microsoft Active Directory. AWS manages the infrastructure required to run Active Directory and handles all of the patching and software updates needed. It’s fully managed, so for example, if a domain controller fails, our monitoring will automatically detect and replace that failed controller.

Manually connecting a machine to Active Directory is a thankless task; you have to connect to the computer, make a series of manual changes, and then perform a reboot. While none of this is particularly challenging, it does take time, and if you have several machines that you want to onboard, then this task quickly becomes a time sink.

Today the team is unveiling a new feature which will enable a Linux EC2 instance, as it is launched, to connect to AWS Directory Service for Microsoft Active Directory seamlessly. This complements the existing feature that allows Windows EC2 instances to seamlessly domain join as they are launched. This capability will enable customers to move faster and improves the experience for Administrators.

Now you can have both your Windows and Linux EC2 instances seamlessly connect to AWS Directory Service for Microsoft Active Directory. The directory can be in your own account or shared with you from another account, the only caveat being that both the instance and the directory must be in the same region.

To show you how the process works, let’s take an existing AWS Directory Service for Microsoft Active Directory and work through the steps required to have a Linux EC2 instance seamlessly join that directory.

Create and Store AD Credentials
To seamlessly join a Linux machine to my AWS Managed Active Directory Domain, I will need an account that has permissions to join instances into the domain. While members of the AWS Delegated Administrators have sufficient privileges to join machines to the domain, I have created a service account that has the minimum privileges required. Our documentation explains how you go about creating this sort of service account.

The seamless domain join feature needs to know the credentials of my active directory service account. To achieve this, I need to create a secret using AWS Secrets Manager with specifically named secret keys, which the seamless domain feature will use to join instances to the directory.

In the AWS Secrets Manager console I click on the Store a new secret button, on the next screen, when asked to Select a secret type, I choose the option named Other type of secrets. I can now add two secret key/values. The first is called awsSeamlessDomainUsername, and in the value textbox, I enter the username for my Active Directory service account. The Second key is called awsSeamlessDomainPassword, and here I enter the password for my service account.

Since this is a demo, I chose to use the DefaultEncryptionKey for the secret, but you might decide to use your own key.

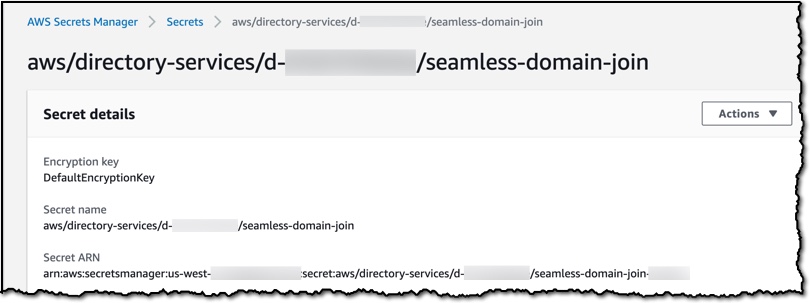
After clicking next, I am asked to give the secret a name. I add the following name, replacing d-xxxxxxxxx with my directory ID.

aws/directory-services/d-xxxxxxxxx/seamless-domain-join

The domain join will fail if you mistype this name or if you have any leading or ending spaces.

I take note down the Secret ARN as I will need it when I create my IAM Policy.
Create The Required IAM Policy and Role
Now I need to create an IAM policy that gives permission to read my seamless-domain-join secret.

I sign in to the IAM console and choose Policies. In the content pane, I select Create policy. I switch over to the JSON tab and copy the text from the following JSON policy document, replacing the Secrets Manager ARN with the one I noted down earlier.

{
    "Version": "2012-10-17",
    "Statement": [
        {
            "Effect": "Allow",
            "Action": [
                "secretsmanager:GetSecretValue",
                "secretsmanager:DescribeSecret"
            ],
            "Resource": [
                "arn:aws:secretsmanager:us-east-1:############:secret:aws/directory-service/d-xxxxxxxxxx/seamless-domain-join-example"
            ]
        }
    ]
}
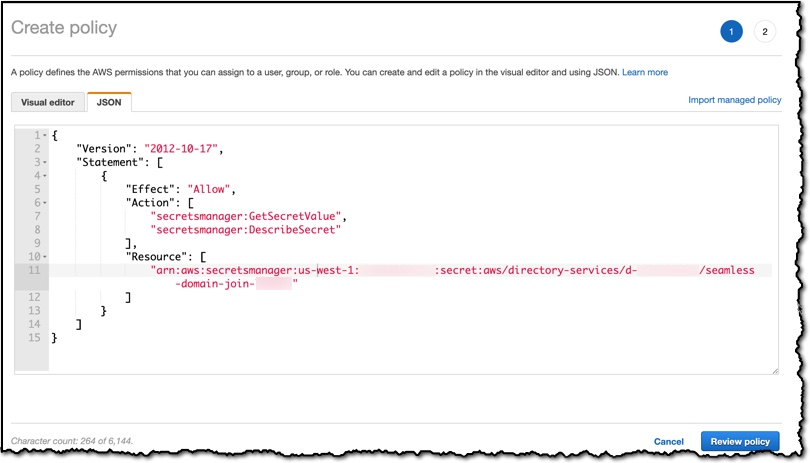
On the Review page, I name the policy SeamlessDomainJoin-Secret-Readonly then choose Create policy to save my work.

Now I need to create an IAM Role that will use this policy (and a few others). In the IAM Console, I choose Roles, and then in the content pane, choose to Create role. Under Select type of trusted entity, I select AWS service and then select EC2 as a use case and click Next:Permissions.


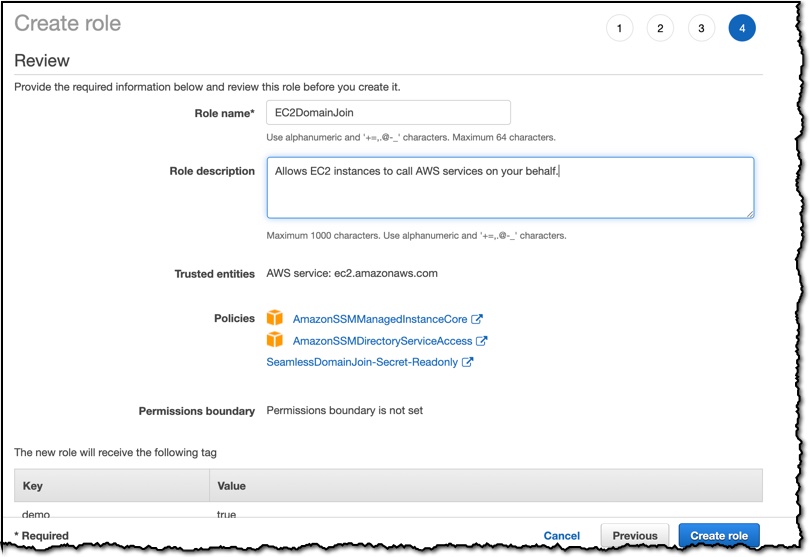
I attach the following policies to my Role: AmazonSSMManagedInstanceCore, AmazonSSMDirectoryServiceAccess, and SeamlessDomainJoin-Secret-Readonly.

I click through to the Review screen where it asks for a Role name, I call the role EC2DomainJoin, but it could be called whatever you like. I then create the role by pressing the button at the bottom right of the screen.
Create an Amazon Machine Image
When I launch a Linux Instance later I will need to pick a Linux Amazon Machine Image (AMI) as a template. Currently, the default Linux AMIs do not contain the version of AWS Systems Manager agent (SSM agent) that this new seamless domain feature needs. Therefore I am going to have to create an AMI with an updated SSM agent. To do this, I first create a new Linux Instance in my account and then connect to it using my SSH client. I then follow the documentation to update the SSM agent to 2.3.1644.0 or newer. Once the instance has finished updating I am then able to create a new AMI based on this instance using the following documentation.

I now have a new AMI which I can use in the next step. In the future, the base AMIs will be updated to use the newer SSM agent, and then we can skip this section. If you are interested to know what version of the SSM agent an instance is using this documentation explains how you can check.

Seamless Join
To start, I need to create a Linux instance, and so I head over to the EC2 console and choose Launch Instance.

Next, I pick a Linux Amazon Machine Image (AMI). I select the AMI which I created earlier.

When configuring the instance, I am careful to choose the Amazon Virtual Private Cloud that contains my directory. Using the drop-down labeled Domain join directory I am able to select the directory that I want this instance to join.

In the IAM role, I select the EC2DomainJoin role that I created earlier.

When I launch this instance, it will seamlessly join my directory. Once the instance comes online, I can confirm everything is working correctly by using SSH to connect to the instance using the administrator credentials of my AWS Directory Service for Microsoft Active Directory.

This new feature is available from today, and we look forward to hearing your feedback about this new capability.

Happy Joining

— Martin Via AWS News Blog https://ift.tt/1EusYcK

Log your VPC DNS queries with Route 53 Resolver Query Logs

The Amazon Route 53 team has just launched a new feature called Route 53 Resolver Query Logs, which will let you log all DNS queries made by resources within your Amazon Virtual Private Cloud. Whether it’s an Amazon Elastic Compute Cloud (EC2) instance, an AWS Lambda function, or a container, if it lives in your Virtual Private Cloud and makes a DNS query, then this feature will log it; you are then able to explore and better understand how your applications are operating.

Our customers explained to us that DNS query logs were important to them. Some wanted the logs so that they could be compliant with regulations, others wished to monitor DNS querying behavior, so they could spot security threats. Others simply wanted to troubleshoot application issues that were related to DNS. The team listened to our customers and have developed what I have found to be an elegant and easy to use solution.

From knowing very little about the Route 53 Resolver, I was able to configure query logging and have it working with barely a second glance at the documentation; which I assure you is a testament to the intuitiveness of the feature rather than me having any significant experience with Route 53 or DNS query logging.

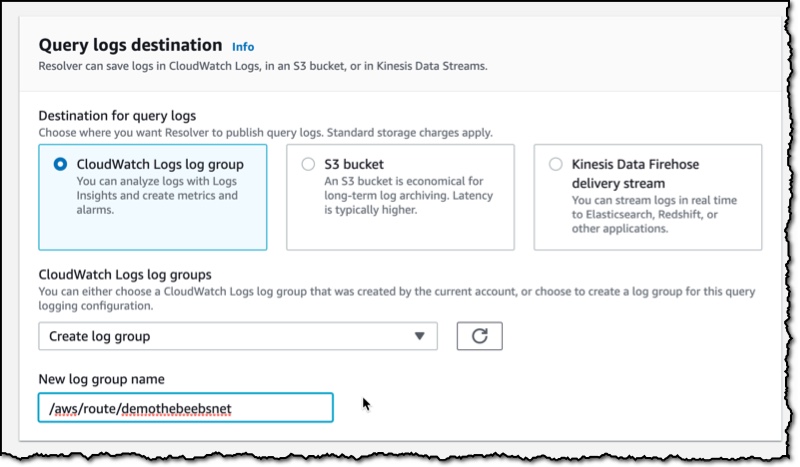
You can choose to have the DNS query logs sent to one of three AWS services: Amazon CloudWatch Logs, Amazon Simple Storage Service (S3), and Amazon Kinesis Data Firehose. The target service you choose will depend mainly on what you want to do with the data. If you have compliance mandates (For example, Australia’s Information Security Registered Assessors Program), then maybe storing the logs in Amazon Simple Storage Service (S3) is a good option. If you have plans to monitor and analyze DNS queries in real-time or you integrate your logs with a 3rd party data analysis tool like Kibana or a SEIM tool like Splunk, than perhaps Amazon Kinesis Data Firehose is the option for you. For those of you who want an easy way to search, query, monitor metrics, or raise alarms, then Amazon CloudWatch Logs is a great choice, and this is what I will show in the following demo.

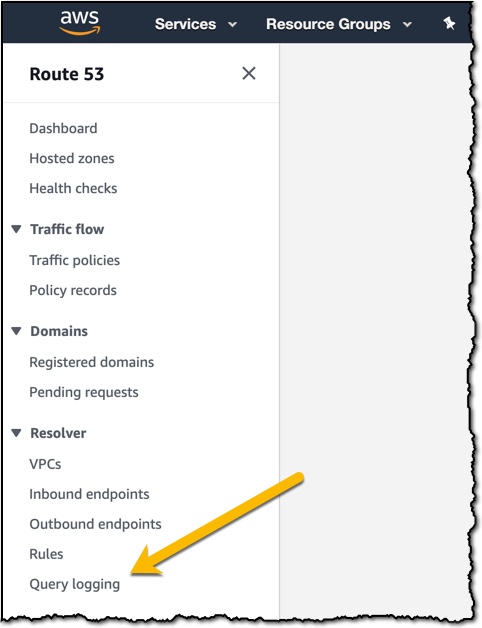
Over in the Route 53 Console, near the Resolver menu section, I see a new item called Query logging. Clicking on this takes me to a screen where I can configure the logging.

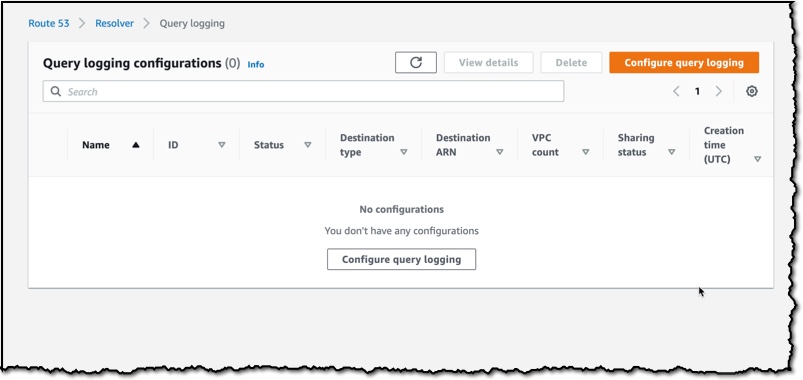
The dashboard shows the current configurations that are setup. I click Configure query logging to get started.

The console asks me to fill out some necessary information, such as a friendly name; I’ve named mine demoNewsBlog.

I am now prompted to select the destination where I would like my logs to be sent. I choose the CloudWatch Logs log group and select the option to Create log group. I give my new log group the name /aws/route/demothebeebsnet.

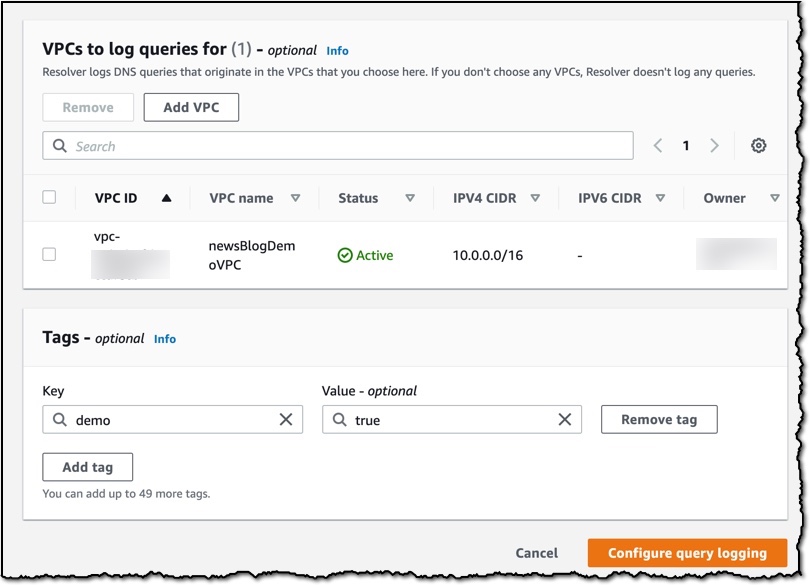
Next, I need to select what VPC I would like to log queries for. Any resource that sits inside the VPCs I choose here will have their DNS queries logged. You are also able to add tags to this configuration. I am in the habit of tagging anything that I use as part of a demo with the tag demo. This is so I can easily distinguish between demo resources and live resources in my account.

Finally, I press the Configure query logging button, and the configuration is saved. Within a few moments, the service has successfully enabled the query logging in my VPC.

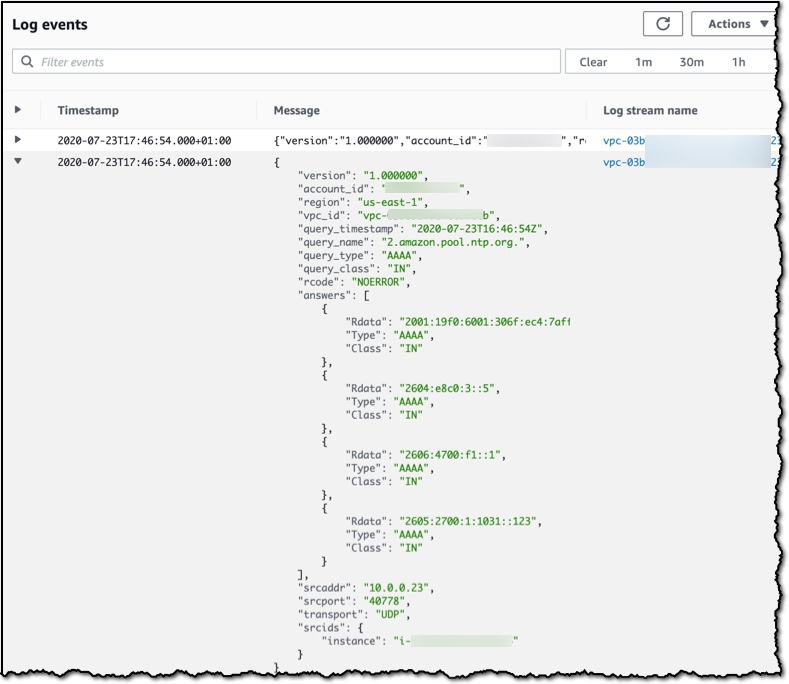
After a few minutes, I log into the Amazon CloudWatch Logs console and can see that the logs have started to appear.

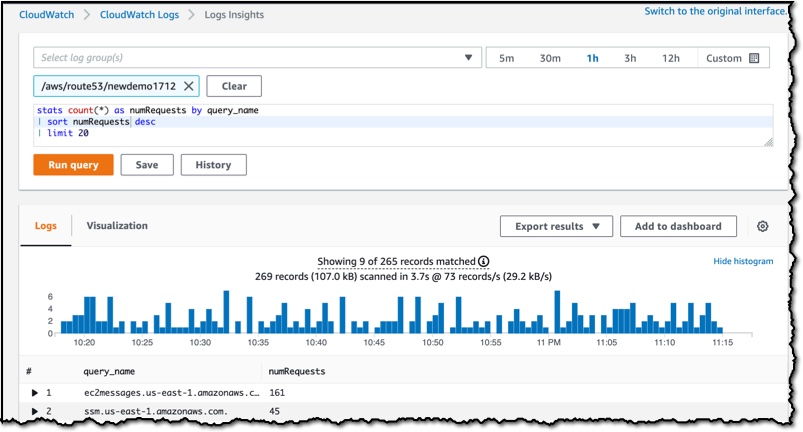
As you can see below, I was quickly able to start searching my logs and running queries using Amazon CloudWatch Logs Insights.

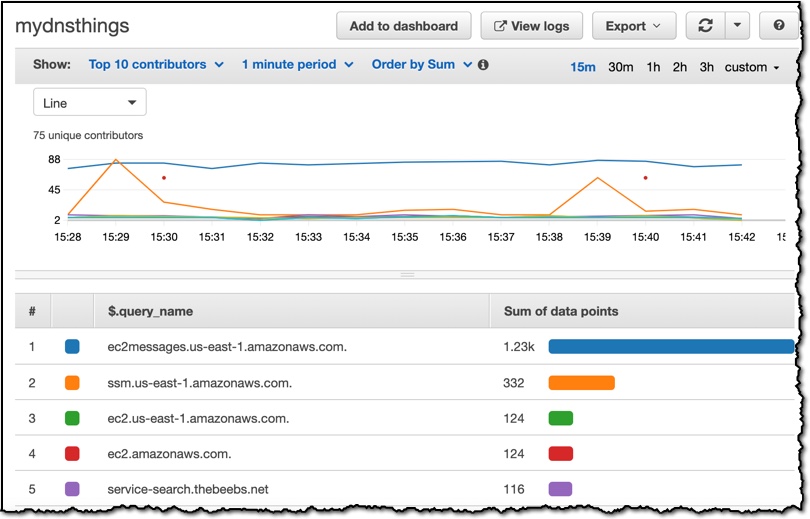
There is a lot you can do with the Amazon CloudWatch Logs service, for example, I could use CloudWatch Metric Filters to automatically generate metrics or even create dashboards. While putting this demo together, I also discovered a feature inside of Amazon CloudWatch Logs called Contributor Insights that enables you to analyze log data and create time series that display top talkers. Very quickly, I was able to produce this graph, which lists out the most common DNS queries over time.
Route 53 Resolver Query Logs is available in all AWS Commercial Regions that support Route 53 Resolver Endpoints, and you can get started using either the API or the AWS Console. You do not pay for the Route 53 Resolver Query Logs, but you will pay for handling the logs in the destination service that you choose. So, for example, if you decided to use Amazon Kinesis Data Firehose, then you will incur the regular charges for handling logs with the Amazon Kinesis Data Firehose service.

Happy Logging

— Martin Via AWS News Blog https://ift.tt/1EusYcK

Tuesday, August 25, 2020

Cloud migration gets harder

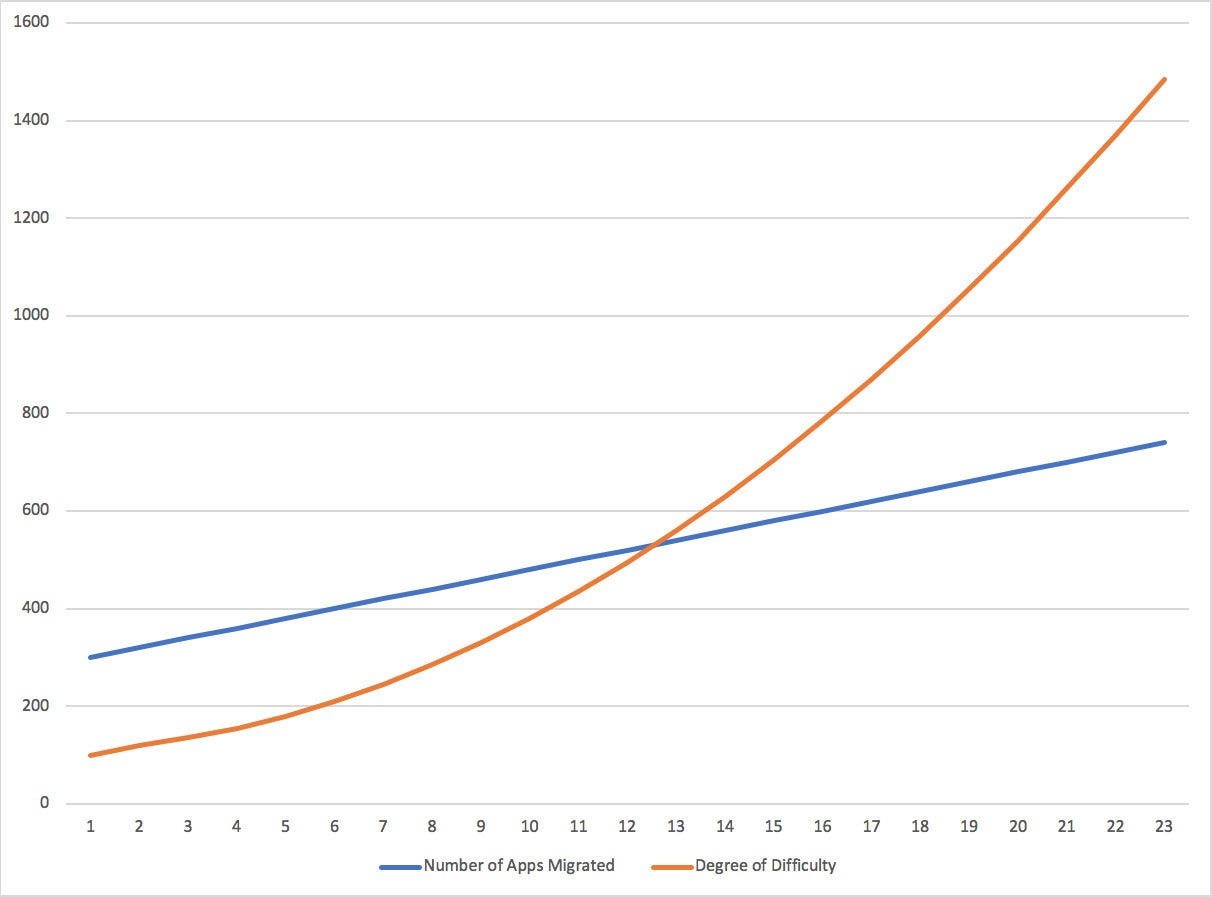
The chart below depicts the number of applications migrated over time in blue, and the degree of difficulty of moving those applications in orange. This is a fictional collection of applications; however, the concept that difficulty increases the more you migrate affects enterprises large and small as they move to the public cloud.  

See this chart: 

cloud migration difficulty IDG

What’s occurring is easy to explain, but the solution to the problem is not. 

To read this article in full, please click here