Tuesday, December 15, 2020

New – AWS Systems Manager Consolidates Application Management

A desire for consolidated, and simplified operational oversight isn’t limited to just cloud infrastructure. Increasingly, customers ask us for a “single pane of glass” approach for also monitoring and managing their application portfolios.

These customers tell us that detection and investigation of application issues takes additional time and effort, due to the typical use of multiple consoles, tools, and sources of information such as resource usage metrics, logs, and more, to enable their DevOps engineers to obtain context about the application issue under investigation. Here, an “application” means not just the application code but also the logical group of resources that act as a unit to host the application, along with ownership boundaries for operators, and environments such as development, staging, and production.

Today, I’m pleased to announce a new feature of AWS Systems Manager, called Application Manager. Application Manager aggregates operational information from multiple AWS services and Systems Manager capabilities into a single console, making it easier to view operational data for your applications.

To make it even more convenient, the service can automatically discover your applications. Today, auto-discovery is available for applications running in AWS CloudFormation stacks and Amazon Elastic Kubernetes Service (EKS) clusters, or launched using AWS Launch Wizard. Applications can also be discovered from Resource Groups.

A particular benefit of automated discovery is that application components and resources are automatically kept up-to-date on an ongoing basis, but you can also always revise applications as needed by adding or deleting components manually.

With applications discovered and consolidated into a single console, you can more easily diagnose operational issues and resolve them with minimal time and effort. Automated runbooks targeting an application component or resource can be run to help remediate operational issues. For any given application, you can select a resource and explore relevant details without needing to leave the console.

For example, the application can surface Amazon CloudWatch logs, operational metrics, AWS CloudTrail logs, and configuration changes, removing the need to engage with multiple tools or consoles. This means your on-call engineers can understand issues more quickly and reduce the time needed to resolve them.

Exploring an Application with Application Manager
I can access Application Manager from the Systems Manager home page. Once open, I get an overview of my discovered applications and can see immediately that there are some alarms, without needing to switch context to the Amazon CloudWatch console, and some operations items (“OpsItems”) that I might need to pay attention to. I can also switch to the Applications tab to view the collections of applications, or I can click the buttons in the Applications panel for the collection I’m interested in.

Screenshot of the <span title="">Application Manager</span> overview page

In the screenshot below, I’ve navigated to a sample application and again, have indicators showing that alarms have raised. The various tabs enable me to drill into more detail to view resources used by the application, config resource and rules compliance, monitoring alarms, logs, and automation runbooks associated with the application.

Screenshot of application components and overview

Clicking on the Alarm indicator takes me into the Monitoring tab, and it shows that the ConsumedWriteCapacityUnits alarm has been raised. I can change the timescale to zero in on when the event occurred, or I can use the View recent alarms dashboard link to jump into the Amazon CloudWatch Alarms console to view more detail.

Screenshot of alarms on the <span title="">Application Manager</span> Monitoring tab

The Logs tab shows me a consolidated list of log groups for the application, and clicking a log group name takes me directly to the CloudWatch Logs where I can inspect the log streams, and take advantage of Log Insights to dive deeper by querying the log data.

OpsItems shows me operational issues associated with the resources of my application, and enables me to indicate the current status of the issue (open, in progress, resolved). Below, I am marking investigation of a stopped EC2 instance as in progress.

Screenshot of <span title="">Application Manager</span> OpsItems tab

Finally, Runbooks shows me automation documents associated with the application and their execution status. Below, it’s showing that I ran the AWS-RestartEC2Instance automation document to restart the EC2 instance that was stopped, and I would now resolve the issue logged in the OpsItems tab.

Screenshot of <span title="">Application Manager</span>'s Runbooks tab

Consolidating this information into a single console gives engineers a single starting location to monitor and investigate issues arising with their applications, and automatic discovery of applications and resources makes getting started simple. AWS Systems Manager Application Manager is available today, at no extra charge, in all public AWS Regions where Systems Manager is available.

Learn more about Application Manager and get started at AWS Systems Manager.

— Steve Via AWS News Blog https://ift.tt/1EusYcK

New – AWS Systems Manager Fleet Manager

Organizations, and their systems administrators, routinely face challenges in managing increasingly diverse portfolios of IT infrastructure across cloud and on-premises environments. Different tools, consoles, services, operating systems, procedures, and vendors all contribute to complicate relatively common, and related, management tasks. As workloads are modernized to adopt Linux and open-source software, those same systems administrators, who may be more familiar with GUI-based management tools from a Windows background, have to continually adapt and quickly learn new tools, approaches, and skill sets.

AWS Systems Manager is an operational hub enabling you to manage resources on AWS and on-premises. Available today, Fleet Manager is a new console based experience in Systems Manager that enables systems administrators to view and administer their fleets of managed instances from a single location, in an operating-system-agnostic manner, without needing to resort to remote connections with SSH or RDP. As described in the documentation, managed instances includes those running Windows, Linux, and macOS operating systems, in both the AWS Cloud and on-premises. Fleet Manager gives you an aggregated view of your compute instances regardless of where they exist.

All that’s needed, whether for cloud or on-premises servers, is the Systems Manager agent installed on each server to be managed, some AWS Identity and Access Management (IAM) permissions, and AWS Key Management Service (KMS) enabled for Systems Manager‘s Session Manager. This makes it an easy and cost-effective approach for remote management of servers running in multiple environments without needing to pay the licensing cost of expensive management tools you may be using today. As noted earlier, it also works with instances running macOS. With the agent software and permissions set up, Fleet Manager enables you to explore and manage your servers from a single console environment. For example, you can navigate file systems, work with the registry on Windows servers, manage users, and troubleshoot logs (including viewing Windows event logs) and monitor common performance counters without needing the Amazon CloudWatch agent to be installed.

Exploring an Instance With Fleet Manager
To get started exploring my instances using Fleet Manager, I first head to the Systems Manager console. There, I select the new Fleet Manager entry on the navigation toolbar. I can also select the Managed Instances option – Fleet Manager replaces Managed Instances going forward, but the original navigation toolbar entry will be kept for backwards compatibility for a short while. But, before we go on to explore my instances, I need to take you on a brief detour.

When you select Fleet Manager, as with some other views in Systems Manager, a check is performed to verify that a role, named AmazonSSMRoleForInstancesQuickSetup, exists in your account. If you’ve used other components of Systems Manager in the past, it’s quite possible that it does. The role is used to permit Systems Manager to access your instances on your behalf and if the role exists, then you’re directed to the requested view. If however the role doesn’t exist, you’ll first be taken to the Quick Setup view. This in itself will trigger creation of the role, but you might want to explore the capabilities of Quick Setup, which you can also access any time from the navigation toolbar.

Quick Setup is a feature of Systems Manager that you can use to set up specific configuration items, such as the Systems Manager and CloudWatch agents on your instances (and keep them up-to-date), and also IAM roles permitting access to your resources for Systems Manager components. For this post, all the instances I’m going to use already have the required agent set up, including the role permissions, so I’m not going to discuss this view further but I encourage you to check it out. I also want to remind you that to take full advantage of Fleet Manager‘s capabilities you first need to have KMS encryption enabled for your instances and secondly, the role attached to your Amazon Elastic Compute Cloud (EC2) instances must have the kms:Decrypt role permission included, referencing the key you selected when you enabled KMS encryption. You can enable encryption, and select the KMS key, using the Preferences section of the Session Manager console, and of course you can set up the role permission in the IAM console.

That’s it for the diversion; if you have the role already, as I do, you’ll now be at the Managed instances list view. If you’re at Quick Setup instead, simply click the Fleet Manager navigation button once more.

The Managed instances view shows me all of my instances, in the cloud or on-premises, that I can access. Selecting an instance, in this case an EC2 Windows instance launched using AWS Elastic Beanstalk, and clicking Instance actions presents me with a menu of options. The options (less those specific to Windows) are available for my Amazon Linux instance too, and for instances running macOS I can use the View file system option.

Screenshot of <span title="">Fleet Manager</span>'s Managed instances view

The File system view displays a read-only view onto the file system of the selected instance. This can be particularly useful for viewing text-based log files, for example, where I can preview up to 10,000 lines of a log file and even tail it to view changes as the log updates. I used this to open and tail an IIS web server log on my Windows Server instance. Having selected the instance, I next select View file system from the Instance actions dropdown (or I can click the Instance ID to open a view onto that instance and select File system from the menu displayed on the instance view).

Having opened the file system view for my instance, I navigate to the folder on the instance containing the IIS web server logs.

Screenshot of <span title="">Fleet Manager</span>'s File system view

Selecting a log file, I then click Actions and select Tail file. This opens a view onto the log file contents, which updates automatically as new content is written.

Screenshot of tailing a log file in <span title="">Fleet Manager</span>

As I mentioned, the File system view is also accessible for macOS-based instances. For example, here is a screenshot of viewing the Applications folder on an EC2 macOS instance.

Screenshot of macOS file system view in <span title="">Fleet Manager</span>

Next, let’s examine the Performance counters view, which is available for both Windows and Linux instances. This view displays CPU, memory, network traffic, and disk I/O and will be familiar to Windows users from Task Manager. The metrics shown reflect the guest OS metrics, whereas EC2 instance metrics you may be used to relate to the hypervisor. On this particular instance I’ve deployed an ASP.NET Core 5 application, which generates a varying length collection of Fibonacci numbers on page refresh. Below is a snapshot of the counters, after I’ve put the instance under a small amount of load. The view updates automatically every 5 seconds.

Screenshot of <span title="">Fleet Manager</span>'s Performance Counters view

There are more views available than I have space for in this post. Using the Windows Registry view, I can view and edit the registry on the selected Windows instance. Windows event logs gives me access to the Application and Service logs, and common Windows logs such as System, Setup, Security, etc. With Users and groups I can manage users or groups, including assignment of users to groups (again for both Windows and Linux instances). For all views, Fleet Manager enables me to use a single and convenient console.

Getting Started
AWS Systems Manager Fleet Manager is available today for use with managed instances running Windows, Linux, and macOS. Information on pricing, for this and other Systems Manager features, can be found at this page.

Learn more, and get started with Fleet Manager today, at AWS Systems Manager.

— Steve Via AWS News Blog https://ift.tt/1EusYcK

Introducing AWS Systems Manager Change Manager

Because you are constantly listening to the feedback from your customer, you are iterating, innovating, and improving your applications and infrastructures. You continually modify your IT systems in the cloud. And let’s face it, changing something in a working system risks breaking things or introducing side effects that are sometimes unpredictable; it doesn’t matter how many tests you do. On the other hand, not making changes is stasis, followed by irrelevance, followed by death.

This is why organizations of all sizes and types have embraced a culture of controlling changes. Some organizations adopt change management processes such as the ones defined in ITIL v4. Some have adopted DevOps’ Continuous Deployment, or other methods. In any case, to support your change management processes, it is important to have tools.

Today, we are launching AWS Systems Manager Change Manager, a new change management capability for AWS Systems Manager. It simplifies the way ops engineers track, approve, and implement operational changes to their application configurations and infrastructures.

Using Change Manager has two primary advantages. First, it can improve the safety of changes made to application configurations and infrastructures, reducing the risk of service disruptions. It makes operational changes safer by tracking that only approved changes are being implemented. Secondly, it is tightly integrated with other AWS services, such as AWS Organizations and AWS Single Sign-On, or the integration with the Systems Manager change calendar and Amazon CloudWatch alarms.

Change Manager provides accountability with a consistent way to report and audit changes made across your organization, their intent, and who approved and implemented them.

Change Manager works across AWS Regions and multiple AWS accounts. It works closely with Organizations and AWS SSO to manage changes from a central point and to deploy them in a controlled way across your global infrastructure.

Terminology
You can use AWS Systems Manager Change Manager on a single AWS account, but most of the time, you will use it in a multi-account configuration.

The way you manage changes across multiple AWS accounts depends on how these accounts are linked together. Change Manager uses the relationships between your accounts defined in AWS Organizations. When using Change Manager, there are three types of accounts:

  • The management account – also known as the “main account” or “root account.” The management account is the root account in an AWS Organizations hierarchy. It is the management account by virtue of this fact.
  • The delegated administrator account – A delegated administrator account is an account that has been granted permission to manage other accounts in Organizations. In the Change Manager context, this is the account from which change requests will be initiated. You will typically log in to this account to manage templates and change requests. Using a delegated administrators account allows you to limit connections made to the root account. It also allows you to enforce a least privileges policy by using a specific subset of permissions required by the changes.
  • The member accounts – Member accounts are accounts that are not the management account or a delegated administrator account, but are still included in Organizations. In my mental model for Change Manager, these would be the accounts that hold the resources where changes are deployed. A delegated administrator account would initiate a change request that would impact resources in a member account. System administrators are discouraged from logging directly into these accounts.

Let’s see how you can use AWS Systems Manager Change Manager by taking a short walk-through demo.

One-Time Configuration
In this scenario, I show you how to use Change Manager with multiple AWS accounts linked together with Organizations. If you are not interested in the one-time configuration, jump to the Create a Change Request section below.

There are four one-time configuration actions to take before using Change Manager: one action in the root account and three in the delegated administrator account. In the root account, I use Quick Setup to define my delegated administrator account and initially configure permissions on the accounts. In the delegated administrator account, you define your source of user identities, you define what users have permissions to approve change templates, and you define a change request template.

First, I ensure I have an Organization in place and my AWS accounts are organized in Organizational Units (OU). For the purpose of this simple example, I have three accounts: the root account, the delegated administrator account in the management OU and a member account in the managed OU. When ready, I use Quick Setup on the root account to configure my accounts. There are multiple paths leading to Quick Setup; for this demo, I use the blue banner on top of the Quick Setup console, and I click Setup Change Manager.

Change Manager Quick Setup


On the Quick Setup page, I enter the ID of the delegated administrator account if I haven’t defined it already. Then I choose the permissions boundaries I grant to the delegated administrator account to perform changes on my behalf. This is the maximum permissions Change Manager receives to make changes. I will further restrict this permission set when I create change requests in a few minutes. In this example, I grant Change Manager permissions to call any ec2 API. This effectively authorizes Change Manager to only run changes related to EC2 instances.

Change Manager Quick Setup

Lower on the screen, I choose the set of accounts that are targets for my changes. I choose between Entire organization or Custom to select one or multiple OUs.

Change Manager Quick Setup 2

After a while, Quick Setup finishes configuring my AWS accounts permission and I can move to the second part of the one-time setup.

Change Manager Quick Setup 3

Second, I switch to my delegated administrator account. Change Manager asks me how I manage users in my organization: with AWS Identity and Access Management (IAM) or AWS Single Sign-On? This defines where Change Manager pulls user identities when I choose approvers. This is a one-time configuration option. This can be changed at any time in the Change Manager Settings page.

Change Manager Settings

Third, on the same page, I define an Amazon Simple Notification Service (SNS) topic to receive notifications about template reviews. This channel is notified any time a template is created or modified, to let template approvers review and approve templates. I also define the IAM (or SSO) user with permission to approve change templates (more about these in one minute).

Change Manager Template Reviewers

Optionally, you can use the existing AWS Systems Manager Change Calendar to define the periods where changes are not authorized, such as marketing events or holiday sales.

Finally, I define a change template. Every change request is created from a template. Templates define common parameters for all change requests based on them, such as the change request approvers, the actions to perform, or the SNS topic to send notifications of progress. You can enforce the review and approval of templates before they can be used. It makes sense to create multiple templates to handle different type of changes. For example, you can create one template for standard changes, and one for emergency changes that overrides the change calendar. Or you can create different templates for different types of automation run books (documents).

To help you to get started, we created a template for you: the “Hello World” template. You can use it as a starting point to create a change request and test out your approval flow.

At any time, I can create my own template. Let’s imagine my system administrator team is frequently restarting EC2 instances. I create a template allowing them to create change requests to restart one or multiple instances. Using the delegated administrator account, I navigate to the Change Manager management console and click Create template.

Change Manager Create Template

In a nutshell, a template defines the list of authorized actions, where to send notifications and who can approve the change request. Actions are an AWS Systems Manager runbook. Emergency change templates allow change requests to bypass the change calendar I wrote about earlier. Under Runbook Options, I choose one or multiple runbooks allowed to run. For this example, I choose the AWS EC2RestartInstance runbook.

I use the console to create the template, but templates are defined internally as YAML. I can edit the YAML using the Editor tab, or when I am using the AWS Command Line Interface (CLI) or API. This means I can version control them just like the rest of my infrastructure (as code).Change Manager Create Template part 1

Just below, I document my template using text formatted as markdown format. I use this section to document the defining characteristics of the template and provide any necessary instructions, such as back-out procedures, to the requestor.

Change Manager Template Documentation

I scroll down that page and click Add Approver to define approvers. Approvers can be individual users or groups. The list of approvers are defined either at the template level or in the change request itself. I also choose to create an SNS topic to inform approvers when any requests are created that require their approval.

In the Monitoring section I select the alarm that, when active, stops any change based on this template, and initiate a rollback.

In the Notifications section, I select or create another SNS topic so I’m notified when status changes for this template occur.

Change Manager Create Template part 2

Once I am done, I save the template and submit it for review.

Change Manager Submit Template for Review

Templates have to be reviewed and approved before they can be used. To approve the template, I connect the console as the template_approver user I defined earlier. As template_approver user, I see pending approvals on the Overview tab. Or, I navigate to the Templates tab, select the template I want to review. When I am done reviewing it, I click Approve.

Change Manager Approve Template

Voila, now we’re ready to create change requests based on this template. Remember that all the preceding steps are one-time configurations and can be amended at any time. When existing templates are modified, the changes go through a review and approval process again.

Create a Change Request
To create a change request on any account linked to the Organization, I open a AWS Systems Manager Change Manager console from the delegated administrator account and click Create request.

Change Manager Create Request

I choose the template I want to use and click Next.

Change Manager Select Template I enter a name for this change request. The change is initiated immediately after all approvals are granted, or I specify an optional scheduled time. When the template allows me, I choose the approver for this change. In this example, the approver is defined by the template and cannot be changed. I click Next.

Change Manager Create CR part 1

On the next screen, there are multiple important configuration options, relating to the actual execution of the change:

  • Target location – lets me define on which target AWS accounts and AWS Region I want to run this change.
  • Deployment target – lets me define which resources are the target of this change. One EC2 instance? Or multiple ones identified by their tags, their resources groups, a list of instance IDs, or all EC2 instances.
  • Runbook parameters – lets me define the parameters I want to pass to my runbook, if any.
  • Execution role – lets me define the set of permissions I grant the System Manager to deploy with this change. The permission set must have service changemanagement.ssm.amazonaws.com as principal for the trust policy. Selecting a role allows me to grant the Change Manager runtime a different permission set than the one I have.

Here is an example allowing Change Manager to stop an EC2 instance (you can scope it down to a specific AWS account, specific Region, or specific instances):

{
    "Version": "2012-10-17",
    "Statement": [
        {
            "Effect": "Allow",
            "Action": [
                "ec2:StartInstances",
                "ec2:StopInstances"
            ],
            "Resource": "*",
        },
        {
            "Effect": "Allow",
            "Action": "ec2:DescribeInstances",
            "Resource": "*"
        }
    ]
}

And the associated trust policy:

{
  "Version": "2012-10-17",
  "Statement": [
    {
      "Effect": "Allow",
      "Principal": {
        "Service": "changemanagement.ssm.aws.internal"
      },
      "Action": "sts:AssumeRole"
    }
  ]
}

When I am ready, I click Next. On the last page, I review my data entry and click Submit for approval.

At this stage, the approver receives a notification, based on the SNS topic configured in the template. To continue this demo, I sign out of the console and sign in again as the cr_approver user, which I created, with permission to view and approve change requests.

As the cr_approver user, I navigate to the console, review the change request, and click Approve.

Change Manager Review Change Request

The change request status switches to scheduled, and eventually turns green to Success. At any time, I can click the change request to get the status, and to collect errors, if any.

Change Manager Dashboard with Succeeded Request

I click on the change request to see the details. In particular, the Timeline tab shows the history of this CR.

Change Management CR Timeline

Availability and Pricing
AWS Systems Manager Change Manager is available today in all commercial AWS Regions, except mainland China. The pricing is based on two dimensions: the number of change requests you submit and the total number of API calls made. The number of change requests you submit will be the main cost factor. We will charge $0.29 per change request. Check the pricing page for more details.

You can evaluate Change Manager for free for 30 days, starting on your first change request.

As usual, let us know what you think and let’s get started today

-- seb Via AWS News Blog https://ift.tt/1EusYcK

AWS CloudShell – Command-Line Access to AWS Resources

No matter how much automation you have built, no matter how great you are at practicing Infrastructure as Code (IAC), and no matter how successfully you have transitioned from pets to cattle, you sometimes need to interact with your AWS resources at the command line. You might need to check or adjust a configuration file, make a quick fix to a production environment, or even experiment with some new AWS services or features.

Some of our customers feel most at home when working from within a web browser and have yet to set up or customize their own command-line interface (CLI). They tell is that they don’t want to deal with client applications, public keys, AWS credentials, tooling, and so forth. While none of these steps are difficult or overly time-consuming, they do add complexity and friction and we always like to help you to avoid both.

Introducing AWS CloudShell
Today we are launching AWS CloudShell, with the goal of making the process of getting to an AWS-enabled shell prompt simple and secure, with as little friction as possible. Every shell environment that you run with CloudShell has the AWS Command Line Interface (CLI) (v2) installed and configured so you can run aws commands fresh out of the box. The environments also include the Python and Node runtimes, with many more to come in the future.

To get started, I simply click the CloudShell icon in the AWS Management Console:

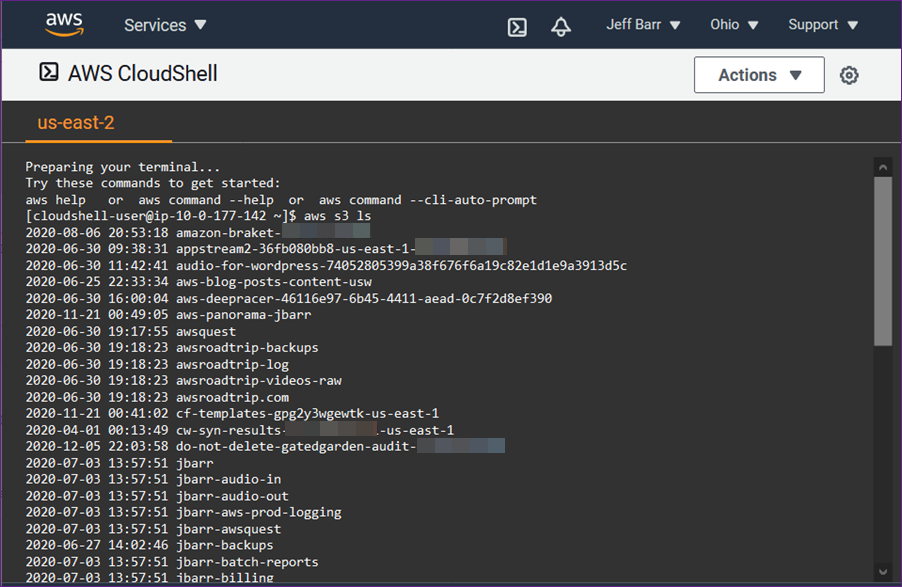
My shell sets itself up in a matter of seconds and I can issue my first aws command immediately:

The shell environment is based on Amazon Linux 2. I can store up to 1 GB of files per region in my home directory and they’ll be available each time I open a shell in the region. This includes shell configuration files such as .bashrc and shell history files.

I can access the shell via SSO or as any IAM principal that can login to the AWS Management Console, including federated roles. In order to access CloudShell, the AWSCloudShellFullAccess policy must be in effect. The shell runs as a normal (non-privileged) user, but I can sudo and install packages if necessary.

Here are a couple of features that you should know about:

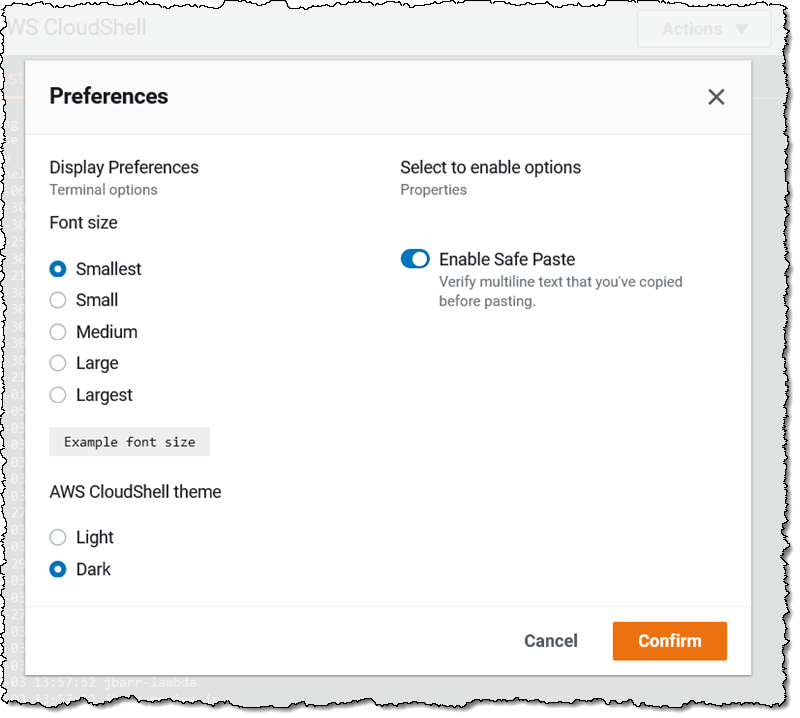
Themes & Font Sizes – You can switch between light and dark color themes, and choose any one of five font sizes:

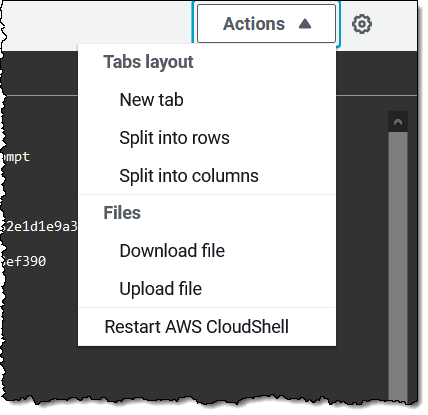
Tabs and Sessions – You can have multiple sessions open within the same region, and you can control the tabbing behavior, with options to split horizontally and vertically:

You can also download files from the shell environment to your desktop, and upload them from your desktop to the shell.

Things to Know
Here are a couple of important things to keep in mind when you are evaluating CloudShell:

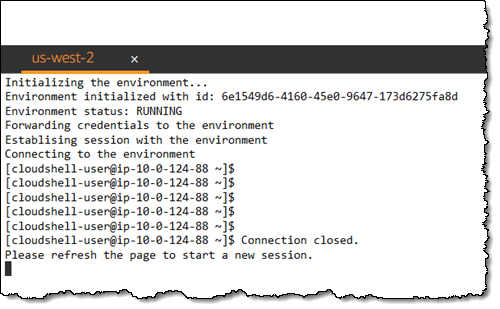
Timeouts & Persistence – Each CloudShell session will timeout after 20 minutes or so of inactivity, and can be reestablished by refreshing the window:

RegionsCloudShell is available today in the US East (N. Virginia), US East (Ohio), US West (Oregon), Europe (Ireland), and Asia Pacific (Tokyo) Regions, with the remaining regions on the near-term roadmap.

Persistent Storage – Files stored within $HOME persist between invocations of CloudShell with a limit of 1 GB per region; all other storage is ephemeral. This means that any software that is installed outside of $HOME will not persist, and that no matter what you change (or break), you can always begin anew with a fresh CloudShell environment.

Network Access – Sessions can make outbound connections to the Internet, but do not allow any type of inbound connections. Sessions cannot currently connect to resources inside of private VPC subnets, but that’s also on the near-term roadmap.

Runtimes – In addition to the Python and Node runtimes, Bash, PowerShell, jq, git, the ECS CLI, the SAM CLI, npm, and pip already installed and ready to use.

Pricing – You can use up to 10 concurrent shells in each region at no charge. You only pay for other AWS resources you use with CloudShell to create and run your applications.

Try it Out
AWS CloudShell is available now and you can start using it today. Launch one and give it a try, and let us know what you think!

Jeff;

Via AWS News Blog https://ift.tt/1EusYcK

Elevating SaaS to its rightful place in the enterprise

According to Gartner, SaaS (software as a service) remains the largest sector of the cloud computing market and is expected to grow to $117.7 billion in 2021 (a 16 percent increase). This is pretty impressive growth, which largely has been driven by the pandemic and the need for SaaS systems to support remote work. 

SaaS has long been the red-headed stepchild of the cloud computing world. Most don’t consider SaaS as part of the cloud, focusing instead on IaaS providers, including AWS, Google, and Microsoft. This is largely because the SaaS world is widely distributed, with more than 5,000 SaaS applications out there, from bail bonds management to full-blown ERP systems on demand. 

To read this article in full, please click here